Mastering The Knot: Your Ultimate Guide To Tying A Tie
Learning how to tie a tie is more than just a sartorial skill; it's a fundamental aspect of presenting oneself with confidence and polish. Whether you’re heading to work, a wedding, or an important event, a well-tied knot can elevate your entire appearance. This comprehensive guide is designed to transform you from a novice to an expert, ensuring you can confidently sport a polished tie in minutes.
For many, the thought of tying a necktie can be daunting, often limited to just one familiar knot. However, there are several ways to tie a tie, each offering a unique aesthetic and suited for different occasions, collar types, and even face shapes. This article will not only teach you the most popular methods but also delve into the nuances of choosing the right knot, achieving the perfect dimple, and ensuring your tie's length is just right. Let's embark on this journey to add a few new knots to your arsenal and truly master the art of the necktie.
Table of Contents
- Why Mastering How to Tie a Tie is Essential
- Before You Begin: Essential Tie Tying Tips
- A Comprehensive Step-by-Step Guide: The Most Popular Knots
- Choosing the Right Knot for the Occasion
- Achieving Perfection: Dimples, Length, and Fit
- Common Mistakes to Avoid When Tying a Tie
- Elevate Your Tie Game: FAQs and Advanced Tips
- The Future of Formal Wear: Staying Polished in 2025 and Beyond
- Conclusion: Mastering Your Look, One Knot at a Time
Why Mastering How to Tie a Tie is Essential
Tying ties is just as important as learning how to knot your shoelaces, yet it's a skill often overlooked or under-practiced. In a world where first impressions matter, a well-tied tie speaks volumes about your attention to detail and professionalism. Even if a man does know how to tie a tie, their knowledge is often limited to just one necktie knot, typically the Four-in-Hand. However, there are several ways to tie a tie, each offering unique benefits and suited for different scenarios.
Beyond professional settings, knowing how to tie a tie is invaluable for social events, from weddings and graduations to formal dinners. It’s a skill that transcends gender, as both men and women can sport a polished tie. This guide aims to provide a comprehensive step-by-step explanation, ensuring you learn how to tie a tie with ease, no matter the occasion. It's about building confidence and adding versatility to your wardrobe, preparing you for any event life throws your way.
Before You Begin: Essential Tie Tying Tips
Before diving into the specific knots, a few foundational tips will significantly improve your tie-tying experience and results. People should practice tying knots in front of a mirror for best results. The animations you might find online, and even the instructions provided here, are presented as though the wearer were seeing his own reflection, making it easier to follow along.
- Mirror Practice: Stand in front of a mirror. This allows you to see the tie as others will, helping you adjust symmetry and tension.
- Starting Position: Always start with the wide end of the tie on the right and the small end on the left. This is the standard setup for most knots and ensures the knot forms correctly.
- Tie Length: The average tie is 58 inches long. However, Machlovitz, a renowned expert in menswear, points out that "Men over 6 foot need a longer tie because the tie point should make it to the area of the waistband of the pants or belt buckle." This crucial detail ensures a balanced look. In a knotted tie, the wide end should just graze the top of your belt buckle or waistband.
- Collar Up: Always start with your shirt collar popped up. This provides ample space to form the knot and allows you to tighten it properly before flipping your collar down.
- Smooth Fabric: Ensure your tie fabric is smooth and free of wrinkles before you start. Ironing your tie can make a significant difference in the final appearance of the knot.
A Comprehensive Step-by-Step Guide: The Most Popular Knots
This section offers a comprehensive step-by-step guide on the different ways to tie a tie. We’ll cover the most popular and versatile knots, providing clear instructions that aim to make even the most difficult-seeming knots simple for you. Our goal is to help you learn how to tie a tie with ease, providing you with the tools to master these essential skills.
The Four-in-Hand Knot: Quick & Classic
The Four-in-Hand knot is arguably the quickest and most popular method to tie a tie. It's asymmetric, slender, and perfect for most shirt collars, especially narrower ones. Its simplicity makes it a fantastic starting point for anyone looking to learn how to tie a tie.
- Start: Drape the tie around your neck with the wide end on your right, extending about 4-6 inches below the narrow end on your left.
- Cross: Bring the wide end over the narrow end.
- Wrap: Bring the wide end underneath the narrow end.
- Cross Again: Bring the wide end over the narrow end again, creating a loop.
- Up Through Loop: Pull the wide end up through the neck loop from underneath.
- Down Through Knot: Thread the wide end down through the loop you just created in the front.
- Tighten: Hold the narrow end and slide the knot up to your neck, gently tightening it.
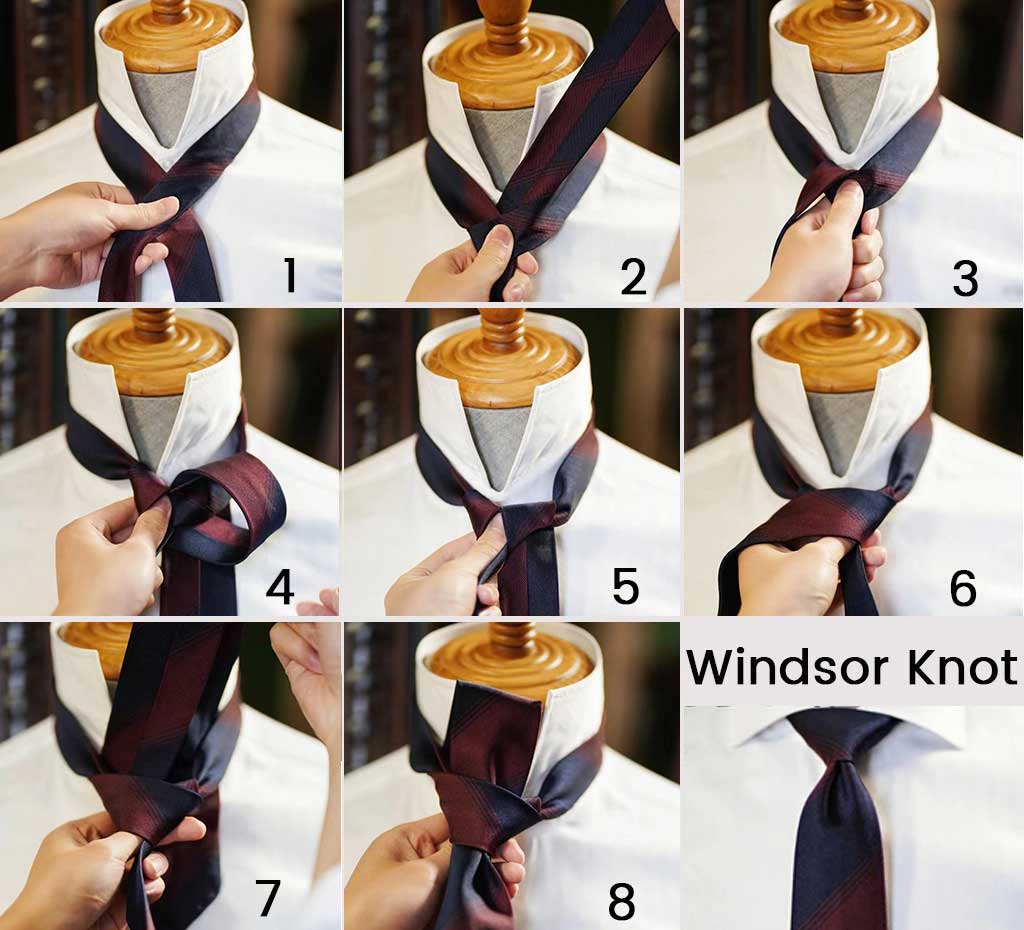
The Windsor Knot: Symmetrical & Formal
The Windsor (aka Double Windsor, Full Windsor) is a popular way of tying a necktie with a sharp, symmetrical, and substantial knot. It exudes formality and confidence, making it ideal for business meetings, formal events, and wide-spread collars.
- Start: Drape the tie around your neck with the wide end on your right, extending significantly lower than the narrow end.
- Cross: Bring the wide end over the narrow end.
- Up Through Neck Loop (Left): Pull the wide end up through the neck loop from underneath.
- Down to Left: Bring the wide end down to your left.
- Behind Narrow End: Bring the wide end behind the narrow end, moving it to the right.
- Up Through Neck Loop (Right): Pull the wide end up through the neck loop from underneath on the right side.
- Down to Right: Bring the wide end down to your right.
- Across Front: Bring the wide end horizontally across the front of the knot, from right to left.
- Up Through Neck Loop (Final): Pull the wide end up through the neck loop from underneath.
- Down Through Front Loop: Thread the wide end down through the horizontal loop you just created in the front.
- Tighten: Hold the narrow end and slide the knot up to your neck, ensuring it's centered and symmetrical.
The Half Windsor Knot: Versatile & Balanced
The Half Windsor knot is a versatile and balanced option, offering a knot that is larger than the Four-in-Hand but smaller than the Full Windsor. It’s moderately symmetrical and works well with most shirt collars, providing a polished yet not overly formal look.
- Start: Drape the tie around your neck with the wide end on your right, extending about 6-8 inches below the narrow end.
- Cross: Bring the wide end over the narrow end.
- Behind Neck Loop: Bring the wide end behind the narrow end, moving it to the right.
- Up Through Neck Loop (Right): Pull the wide end up through the neck loop from underneath on the right side.
- Down to Right: Bring the wide end down to your right.
- Across Front: Bring the wide end horizontally across the front of the knot, from right to left.
- Up Through Neck Loop (Final): Pull the wide end up through the neck loop from underneath.
- Down Through Front Loop: Thread the wide end down through the horizontal loop you just created in the front.
- Tighten: Hold the narrow end and slide the knot up to your neck, adjusting for symmetry and tightness.
Beyond the Basics: Eldredge & Trinity Knots
For those who have mastered the fundamental knots and want to add more to their arsenal, the Eldredge and Trinity knots offer unique, intricate, and eye-catching designs. These knots are less about formal utility and more about making a statement, showcasing advanced tie-tying prowess. You can find detailed visual charts and step-by-step guides for these types of knots on specialized sites like ties.com or Rmrs, which often feature "easy ways of tying a necktie with visual charts."
- The Eldredge Knot: This knot is complex and uses the narrow end of the tie to create a braided, fishtail-like appearance. It's highly distinctive and requires patience and practice.
- The Trinity Knot: Resembling a Celtic knot or a triquetra, the Trinity knot also uses the narrow end to form a three-way symmetrical design. It's elegant and unique, best suited for solid or subtly patterned ties to let the knot's structure shine.
Choosing the Right Knot for the Occasion
Knowing how to tie a tie is one thing; knowing which knot to choose is another. This is where true expertise comes into play. You need to see visual comparisons, tips, and tricks for choosing the right knot for the job. Certain necktie knots should be used with certain shirt collars and tie fabric materials to get the best results for your appearance.
- Collar Type:
- Standard Point Collar: Versatile, works well with Four-in-Hand, Half Windsor.
- Spread Collar (Cutaway): Requires a wider knot like the Full Windsor or Half Windsor to fill the space between the collar points.
- Button-Down Collar: Often paired with a Four-in-Hand for a more casual, preppy look.
- Face Shape & Body Type:
- Narrow Face/Build: A slender knot like the Four-in-Hand can complement your proportions.
- Rounder Face/Broader Build: A wider, more substantial knot like the Windsor can balance your features.
- Tie Fabric & Thickness:
- Thick Ties (Wool, Knit): Best with simpler knots like the Four-in-Hand or Half Windsor to avoid an overly bulky knot.
- Thin Ties (Silk, Satin): Can handle the complexity of a Full Windsor or even the Eldredge/Trinity without becoming too large.
- Occasion:
- Formal/Business: Full Windsor, Half Windsor.
- Everyday/Business Casual: Four-in-Hand, Half Windsor.
- Special Occasion/Statement: Eldredge, Trinity.
Achieving Perfection: Dimples, Length, and Fit
Beyond simply knowing how to tie a tie, true mastery lies in the details. Two critical elements distinguish a perfectly tied tie from an ordinary one: the dimple and the correct length.
- Creating a Dimple: A dimple is the small indentation directly below the knot, adding depth and elegance. To create a dimple, as you tighten the knot, gently pinch the tie fabric just below the knot with your thumb and forefinger, creating a fold. Then, pull the narrow end down to secure the dimple in place. This subtle detail showcases your attention to finesse.
- Adjusting the Length: As mentioned earlier, the ideal length for a knotted tie is when the wide end just grazes the top of your belt buckle or waistband. If your tie is too long or too short, it can throw off your entire look. Practice is key to consistently achieving the right length. If you find your tie is consistently too long, try starting with the narrow end higher up. Conversely, if it's too short, start with the narrow end lower. Remember Machlovitz's advice: "Men over 6 foot need a longer tie because the tie point should make it to the area of the waistband of the pants or belt buckle." This ensures a balanced silhouette.
- Fit and Comfort: The knot should be snug against your neck, but not so tight that it's uncomfortable or restricts breathing. Adjust the knot gently until it sits perfectly at the collar of your shirt. The tie should hang straight and naturally, without twisting or bunching.
Common Mistakes to Avoid When Tying a Tie
Even after learning how to tie a tie, certain common pitfalls can detract from your polished appearance. Being aware of these can help you refine your technique and avoid embarrassing blunders.
- Incorrect Length: This is perhaps the most common mistake. A tie that's too long (past the belt buckle) looks sloppy, while one that's too short (above the belt buckle) looks childish or ill-fitting. Always check the position of the wide end.
- Loose Knot: A floppy or loose knot looks unprofessional. Ensure the knot is snug against your collar. This often comes down to pulling the narrow end firmly (but not excessively) while sliding the knot up.
- No Dimple (or a Forced One): While a dimple adds elegance, a poorly formed or absent one can make the tie look flat. Conversely, a dimple that looks too stiff or forced can also detract. Practice the gentle pinch technique.
- Wrong Knot for Collar: Using a small knot (like the Four-in-Hand) with a wide-spread collar leaves too much shirt exposed, looking disproportionate. Similarly, a large knot (like the Windsor) with a narrow collar can overwhelm it. Refer to the "Choosing the Right Knot" section.
- Twisted Tie: Sometimes, the tie can twist as you're forming the knot, especially with silk ties. Pay attention to keeping the fabric flat throughout the process.
- Uneven Blades: Ensure both the wide and narrow ends of the tie are smooth and untwisted after the knot is formed.
- Ignoring Fabric Thickness: Trying to tie a bulky knot with a thick wool tie will result in an enormous, awkward lump. Adjust your knot choice based on the tie's material.
Elevate Your Tie Game: FAQs and Advanced Tips
In this comprehensive guide, you’ll learn how to tie a tie using the most popular knots—plus discover the history, styling tips, and FAQs to take your tie game from novice to expert. Our how to tie a tie videos and simple instructions (like this guide) allow men and women to sport a polished tie in minutes.
FAQs:
- Q: Can women tie ties?
A: Absolutely! While traditionally associated with men's formal wear, women can and do wear ties as a fashion statement, often incorporating them into professional or avant-garde outfits. The techniques for how to tie a tie are universal.
- Q: How do I untie a tie properly?
A: To preserve your tie, untie it in reverse order of how you tied it. Don't just pull the narrow end through the knot; gently loosen the knot until you can slide it down and unravel the loops. This prevents stretching and damage to the fabric.
- Q: What’s the history of the necktie?
A: The modern necktie's origins can be traced back to the 17th century, during the Thirty Years' War, when Croatian mercenaries serving in France wore small, knotted scarves around their necks. The French, captivated by this "cravat," adopted it, and it quickly became a symbol of sophistication and status. Over centuries, it evolved into the various forms we see today.
Advanced Tips:
- The Perfect Shirt: A well-fitting shirt with the right collar type is crucial. Ensure your collar is clean and pressed, as it frames your knot.
- Tie Bar/Clip: A tie bar or clip not only adds a touch of style but also keeps your tie neatly in place, preventing it from swinging or dipping into food. It should be placed between the third and fourth buttons of your shirt.
- Pattern Matching: When combining patterned shirts and ties, ensure there's a contrast in scale. A wide-striped tie with a narrowly striped shirt, or a small-patterned tie with a larger-patterned shirt. When in doubt, a solid tie is always a safe and elegant choice.
- Material Matters: Silk is the most common tie material, offering a smooth knot. Wool ties are thicker and more casual, while knit ties offer a unique texture. Consider the material when choosing your knot.
The Future of Formal Wear: Staying Polished in 2025 and Beyond
While fashion trends evolve, the fundamental skill of knowing how to tie a tie knot remains timeless. Even as we look towards 2025 and beyond, the ability to present oneself impeccably will always be valued. Whether it's a classic Windsor for a high-stakes business meeting or a more relaxed Four-in-Hand for a smart-casual event, the versatility of the necktie ensures its continued relevance.
The emphasis on personal branding and professional presentation continues to grow, making these traditional skills more important than ever. Mastering how to tie a tie isn't just about adhering to dress codes; it's about projecting confidence, competence, and respect for the occasion. It's a small detail that can make a big difference in how you're perceived, and it's a skill that will serve you well for years to come.
Conclusion: Mastering Your Look, One Knot at a Time
Learning how to tie a tie is an invaluable skill that enhances your personal style and confidence. From the everyday simplicity of the Four-in-Hand to the formal elegance of the Windsor, and even the intricate artistry of the Eldredge, each knot offers a unique way to express yourself. We've explored the step-by-step processes, the nuances of choosing the right knot for your collar and occasion, and crucial tips for achieving that perfect dimple and length.
Remember, practice makes perfect. People should practice tying knots in front of a mirror for best results, and don't be discouraged if it takes a few tries to get it right. With this comprehensive guide, you now have the knowledge to take your tie game from novice to expert. So go ahead, experiment with different knots, find what suits you best, and confidently step out with a perfectly tied tie. What's your favorite knot, or which one are you excited to try first? Share your thoughts in the comments below!

How to Tie a Tie (50 Different Types of Tie Knots with Instructions

How To Tie A Tie Knot - 17 Different Ways of Tying Necktie Knots
How to Tie a Tie? 4 Classic tie knots every man should know! – Tonywell
