Mastering The Ocean's Predator: How To Draw A Shark
Are you fascinated by the ocean's most iconic and powerful creatures? Do you dream of capturing their sleek, formidable beauty on paper? Then you've come to the right place! Learning how to draw a shark can be an incredibly rewarding artistic journey, opening up a world of creative expression and a deeper appreciation for these magnificent animals. Whether you're a complete beginner or looking to refine your skills, this comprehensive guide will walk you through everything you need to know to bring a shark to life with your own hands.
From the terrifying grace of a Great White to the playful charm of a cartoon shark, there are countless ways to approach this subject. This article will provide you with step-by-step instructions, essential tips on shapes, fins, and coloring, and insights into various shark types. Grab a piece of paper, a pencil, and get ready to have fun as we dive deep into the art of drawing sharks!
Table of Contents
- Why Learn How to Draw a Shark?
- Essential Art Supplies for Your Shark Drawing Adventure
- The Foundational Steps: How to Draw a Simple Shark
- Diving Deeper: How to Draw a Realistic Great White Shark
- Exploring Different Styles: From Cartoon to Grey Reef Shark
- Refining Your Shark Drawing: Polishing and Details
- Creative Shark Projects: Folding Puppets and More
- Common Pitfalls and Pro Tips for Drawing Sharks
Why Learn How to Draw a Shark?
Sharks are one of the most iconic and feared creatures of the ocean, captivating our imaginations with their power and mystery. Learning how to draw a shark isn't just about putting lines on paper; it's about understanding form, movement, and the subtle nuances that make these animals so compelling. It's a fantastic way to improve your overall drawing skills while focusing on a subject that offers both artistic challenge and immense satisfaction.
The Allure of Aquatic Art
There's something uniquely appealing about drawing marine life. The fluidity of water, the diverse forms of its inhabitants, and the sheer wonder of the underwater world provide endless inspiration. Sharks, with their streamlined bodies and powerful presence, are a prime example of this allure. By learning how to draw a shark, you're not just replicating an image; you're engaging with a creature that embodies strength, speed, and ancient wisdom. This can be a super fun art project for any age, from kids just starting their artistic journey to adults looking for a relaxing and engaging hobby.
Beyond the Basics: Shark Anatomy for Artists
To truly master how to draw a shark, especially a realistic one, a basic understanding of their anatomy is incredibly helpful. We'll explore how their sleek, streamlined bodies contribute to their speed, the distinct shapes of their various fins, and the placement of their eyes, nostrils, and gills. For instance, a Grey Reef shark has a sleek, streamlined body with a pointed snout and a large, triangular fin on its back, while its large, round eyes are located on the sides of its head. Understanding these features will allow you to create drawings that are not only visually appealing but also biologically accurate, adding depth and credibility to your artwork.
Essential Art Supplies for Your Shark Drawing Adventure
One of the best things about learning how to draw a shark is that you don't need a vast array of expensive materials to get started. All you need is something to draw with, paper, and coloring supplies. This makes it an accessible and enjoyable activity for everyone, whether you're at home, in a classroom, or just looking for a quick creative outlet.
- Cash Me Outside Girl
- What Does Ts Mean
- Listcrawler Atlanta
- Hard Fought Hallelujah Lyrics
- Saiveon Hopkins
Getting Started: What You Really Need
Here's a list of the basic supplies we recommend, but remember, feel free to use whatever you have in your home or classroom:
- Pencils: A standard graphite pencil (HB or 2B is great for sketching) is perfect. You might also want a harder pencil (2H) for light guidelines and a softer one (4B or 6B) for darker shading.
- Paper: Any drawing paper will do! Sketchbook paper, printer paper, or even construction paper are all suitable.
- Eraser: A good quality kneaded eraser or a plastic eraser will help you clean up mistakes and refine your lines without damaging the paper.
- Coloring Supplies: Crayons, colored pencils, markers, or even watercolors can be used to add life to your shark drawing.
Grab a piece of paper, a pencil, and get ready to have fun!
Elevating Your Artwork: Optional Tools
If you're looking to take your shark drawings to the next level, here are a few optional art supplies that can enhance your experience:
- Blending Stumps/Tortillons: These paper tools are excellent for smoothing out graphite or colored pencil shading, giving your shark a more realistic texture.
- Fine-liner Pens: For crisp outlines and intricate details, a set of fine-liner pens in various thicknesses can be very useful.
- Reference Images: While this article provides guidance, having a few high-quality reference photos of different shark species can be invaluable for achieving accuracy and realism.
- Specific Paper Types: If you plan on using markers or watercolors, consider heavier paper designed for those mediums to prevent bleed-through.
For those interested in drawing a realistic Great White shark, investing in quality art supplies can make a noticeable difference in the final outcome. Many artists find success with specific brands; you can often find art supplies we love through online art stores or local craft shops.
The Foundational Steps: How to Draw a Simple Shark
Learning how to draw a shark doesn't have to be intimidating. This is a very easy art tutorial for beginners, perfect for kids! We'll start with the basic overall body shape and then add all those fins in just the right places. Follow me step by step, and if you need more time, simply pause and take your time. This guide is designed to be super easy for kids and beginners alike.
Building the Basic Body Shape
Every great drawing starts with simple shapes. For a simple shark, we'll begin with a foundational structure:
- Start with a Round Circle: This will serve as the base for the shark's head and upper body.
- Add the Body Line: From the circle, extend a curved line backwards, tapering slightly towards where the tail will be. This line will define the shark's sleek, streamlined body.
- Form the Lower Body: Below the initial circle, draw a curved triangle extending to the left. This will form the lower jaw and belly area. Think of it as connecting the circle to the tapering body line you just drew.
- Define the Snout: On the right side of the circle (or the front of your shark), draw a curved triangle. This will become the shark's pointed snout.
These initial shapes might look abstract, but they are crucial for establishing the correct proportions and flow of your shark. Remember, these are just light sketch lines that you'll refine later.
Adding Fins and Features
Once you have the basic body shape, it's time to add the characteristic features that make it unmistakably a shark:
- The Dorsal Fin: This is the prominent fin on the shark's back. Draw a large, triangular fin on its back, positioned roughly in the middle of the body. Similar to a leaf, the middle part of these two figures should be rounded while the tip must be pointed.
- Pectoral Fins: These are the two fins on the shark's sides, just behind the gills. Draw them as elongated, somewhat triangular shapes that extend outwards.
- Pelvic and Anal Fins: These are smaller fins located on the underside of the shark's body, further back. They are typically smaller and less prominent than the dorsal and pectoral fins.
- The Caudal Fin (Tail): Sketch a fishtail onto the end of the bottom triangle, extending from the tapered body line. The shark's tail is usually powerful and crescent-shaped, designed for propulsion.
- Eyes and Gills: Add large, round eyes that are located on the sides of the head. For the gills, draw a series of vertical slits just behind the head, usually 5-7 of them.
- Mouth: Sketch a curved line for the mouth, often extending back towards the eye, giving the shark its characteristic grin or grimace.
Follow these quick, easy steps and learn how to draw a simple shark. This foundational approach is perfect for beginners and kids!
Diving Deeper: How to Draw a Realistic Great White Shark
If you're ready to learn how to draw a realistic Great White shark, we'll build upon the foundational steps, focusing on more refined details and anatomical accuracy. The Great White is one of the most recognized shark species, making it an excellent subject for realistic drawing. We'll pay close attention to its powerful build, distinctive features, and the subtle textures that give it a lifelike appearance.
- Refined Body Proportions: Great Whites have a robust, torpedo-shaped body. Start with a more elongated oval for the body, tapering significantly towards the tail. The head should be broad and conical.
- Defining the Snout and Jawline: The Great White's snout is pointed, but not overly sharp. Its jawline is very distinct, forming a wide, powerful curve. Pay attention to the subtle bulge where the jaw muscles are.
- Precise Fin Placement and Shape:
- Dorsal Fin: This is large, triangular, and rigid, positioned about halfway down the back. Its leading edge is often slightly curved, and the trailing edge can be concave.
- Pectoral Fins: These are large and scythe-shaped, extending outwards and slightly downwards. They play a crucial role in steering and lift.
- Caudal Fin: The tail fin is crescent-shaped and symmetrical, indicating its power for rapid acceleration.
- Eyes and Gills: Great White eyes are relatively small and dark, located on the sides of the head. The gill slits are prominent, typically five on each side, and should be drawn with a slight curve.
- Skin Texture and Shading: Realistic shark skin isn't smooth; it's covered in dermal denticles, giving it a slightly rough texture. Use subtle shading to indicate muscle definition, light reflection on the dorsal (darker) and ventral (lighter) sides, and the overall sleekness of the body. Pay attention to how light hits the body to create depth and form.
- Scars and Imperfections: For added realism, consider adding subtle scars or nicks, especially around the snout or fins, which are common on these apex predators.
Creating a realistic shark drawing in just a few simple steps requires patience and observation. Watch reference photos closely and try to capture the essence of the Great White's powerful form.
Exploring Different Styles: From Cartoon to Grey Reef Shark
The beauty of art lies in its versatility. While learning how to draw a shark realistically is a fantastic skill, you can also explore various other styles. Here are seven different styles you can try when you learn how to draw a shark step by step, from playful cartoons to specific species like the Grey Reef shark or even a Bull shark or Sand Tiger shark.
- Cartoon Shark: To draw a cartoon shark, draw a circle with a curved triangle on the bottom, extending to the left. On the right side of the circle, draw a curved triangle, and then sketch a fishtail onto the end of the bottom triangle. Cartoon sharks often have exaggerated features like large eyes, wide smiles, and simplified fin shapes, making them super easy for kids to draw and express different features and expressions in four simple steps.
- Simple Shark: This style focuses on clean lines and basic shapes, perfect for quick sketches or for very young artists. It emphasizes the silhouette over intricate details.
- Grey Reef Shark: Here are some tips for drawing a Grey Reef shark: Start by drawing the basic shape of the shark’s body. A Grey Reef shark has a sleek, streamlined body with a pointed snout and a large, triangular fin on its back. Next, add details like the eyes, nostrils, and gills. Grey Reef sharks have large, round eyes that are located on the sides of their heads. Their coloration is typically grey with white undersides.
- Bull Shark: Known for their robust build and short, blunt snout. Emphasize their powerful, stocky body and smaller eyes compared to other species.
- Sand Tiger Shark: Characterized by their jagged, protruding teeth even when their mouth is closed, and their relatively slender bodies. Focus on the distinctive mouth and tooth structure.
- Stylized/Abstract Shark: Experiment with bold lines, geometric shapes, or even patterns to create a shark that is more interpretive than realistic. This allows for immense creative freedom.
- Shark Folding Surprise Puppet: This is a super fun art project for any age! Learn how to draw a shark folding surprise puppet by drawing a shark head and tail on separate sections of paper that can be folded to reveal a hidden "mouth" or "surprise" inside. This combines drawing with paper craft for an interactive art piece.
Each style offers a unique challenge and opportunity to express your creativity. Don't be afraid to experiment and find the style that resonates most with you!
Refining Your Shark Drawing: Polishing and Details
Once you have the main parts of your shark drawing in place, the next crucial step is to refine and smooth the shapes. This is where your drawing truly comes to life, moving from a sketch to a finished piece. It's an important part of learning how to draw a shark that looks natural and polished.
- Go Over the Entire Outline: Carefully trace over your initial sketch lines, making them darker and more confident. Pay attention to the curves and angles, ensuring they flow naturally. Make sure the fins, body, and tail look natural and fairly realistic.
- Smooth the Shapes: Look for any jagged or uneven lines. Use your eraser and pencil to smooth out the contours of the shark's body, fins, and tail. The goal is a sleek, hydrodynamic appearance.
- Add Details and Texture:
- Eyes: Refine the shape of the eyes, adding pupils and perhaps a tiny highlight to give them life.
- Gills: Make the gill slits more defined, giving them a slight depth.
- Teeth: If your shark's mouth is open, carefully draw rows of sharp teeth. Even a closed mouth can have subtle indications of the powerful jawline.
- Skin Texture: Use very light, short strokes or subtle shading to suggest the rough, sandpaper-like texture of shark skin (dermal denticles).
- Scars/Markings: For realism, add subtle scars, nicks, or unique markings that might appear on a shark's body.
- Shading and Dimension: Apply shading to give your shark drawing depth and form. Think about where the light source is coming from and how it would illuminate different parts of the shark's body. Sharks are typically darker on top and lighter on their undersides (countershading), which helps them camouflage in the water. Use cross-hatching, blending, or stippling techniques to build up your values.
- Clean Up Extra Lines or Mistakes: Use your eraser to meticulously clean up any stray sketch lines, smudges, or unwanted marks. A clean drawing looks professional and finished. This step is vital to give the shark drawing a polished and finished look.
Remember, practice makes perfect. The more you refine your drawings, the more natural and realistic they will become. This process is key to truly mastering how to draw a shark with confidence and precision.
Creative Shark Projects: Folding Puppets and More
Drawing sharks doesn't have to be limited to flat paper. You can turn your artwork into interactive and fun projects! One popular idea is to learn how to draw a shark folding surprise puppet. This is a super fun art project for any age, combining drawing with a simple paper craft to create an engaging toy.
Here's how a folding surprise puppet generally works:
- You draw the top part of the shark's head on one section of paper.
- You draw the lower jaw and body on another section, leaving a gap in the middle.
- When folded correctly, the gap becomes the shark's mouth, and you can draw a "surprise" inside – maybe a fish, a tiny boat, or even a smaller shark!
These types of projects are fantastic for kids and can be a great way to reinforce drawing skills while adding a playful element. They can be a fun Friday group activity or kept on hand for your fast finishers in a classroom setting. Beyond puppets, you could also:
- Create a Shark Diorama: Draw and cut out various sharks, fish, and ocean plants, then arrange them in a shoebox for a 3D scene.
- Design a Shark Comic Strip: Give your drawn sharks personalities and create a short story featuring them.
- Make Shark-Themed Cards: Draw a shark on a card for a birthday or special occasion.
These activities encourage creativity and apply your newfound skills in how to draw a shark to different mediums and purposes.
Common Pitfalls and Pro Tips for Drawing Sharks
As with any drawing subject, there are common mistakes beginners make when learning how to draw a shark. Being aware of these can help you avoid them and improve your artwork faster. Here are some pitfalls to watch out for and professional tips to elevate your shark drawings:
Common Pitfalls:
- Disproportionate Fins: Drawing fins too small, too large, or in the wrong place can make a shark look unnatural. Remember, each fin has a specific function and size relative to the body.
- Stiff Poses: Sharks are fluid creatures. Avoid drawing them as rigid, static objects. Even a resting shark has a subtle curve to its body.
- Flat Shading: Not using a range of values (lights and darks) can make your shark look flat and two-dimensional. Shading is key to creating form and depth.
- Overlooking Gills and Eyes: These small details are crucial for realism. Incorrectly placed or shaped gills and eyes can significantly alter the shark's appearance.
- Lack of Reference: Relying solely on memory can lead to inaccuracies. Always use reference photos, especially when aiming for realism or a specific species.
Pro Tips for Drawing Awesome Sharks:
- Start with Basic Shapes: As emphasized, breaking down the shark into simple geometric forms (circles, ovals, triangles) is the best way to start. It helps with proportion and placement.
- Understand Anatomy: Even if you're drawing a cartoon, knowing the basic anatomy of a shark will make your simplified version more believable and dynamic.
- Observe Movement: Watch videos of sharks swimming. Notice how their bodies undulate, how their fins move, and how their tails propel them. This will help you capture dynamic poses.
- Layer Your Shading: Build up your shadows gradually, starting with light layers and adding darker ones for depth. This creates smoother transitions and richer tones.
- Don't Be Afraid to Erase: Drawing is an iterative process. It's okay to make mistakes and erase. In fact, it's part of the learning process. Clean up any extra lines or mistakes to give the shark drawing a polished and finished look.
- Experiment with Angles: Don't always draw a shark from the side profile. Try drawing it from above, below, or head-on to challenge yourself and create more interesting compositions.
- Practice Regularly: Consistency is key. The more you practice, the more your hand-eye coordination will improve, and the more intuitive the process of how to draw a shark will become.
If you want to learn to draw a shark, you’ve come to the right place. These tips, combined with the step-by-step guides, will set you on the path to creating truly awesome sharks!
Conclusion
You've now embarked on an exciting journey, learning how to draw a shark from basic shapes to detailed, realistic renditions. We've covered everything from essential supplies and foundational steps to diving into specific species like the Great White and exploring fun, creative projects like the folding surprise puppet. Remember, the key to mastering any drawing skill, especially something as dynamic as a shark, lies in consistent practice, keen observation, and a willingness to experiment.
Whether you're creating a simple sketch for fun or aiming for a highly detailed masterpiece, the principles remain the same: start with light guidelines, build up your shapes, refine your lines, and add details and shading to bring your vision to life. So, keep practicing, keep exploring different styles, and most importantly, keep having fun! We hope this guide has empowered you to create your own incredible shark drawings. Do you have a favorite shark species you'd like to draw, or perhaps a tip that helped you? Share your thoughts and creations in the comments below, and don't forget to explore our other drawing tutorials for more artistic inspiration!
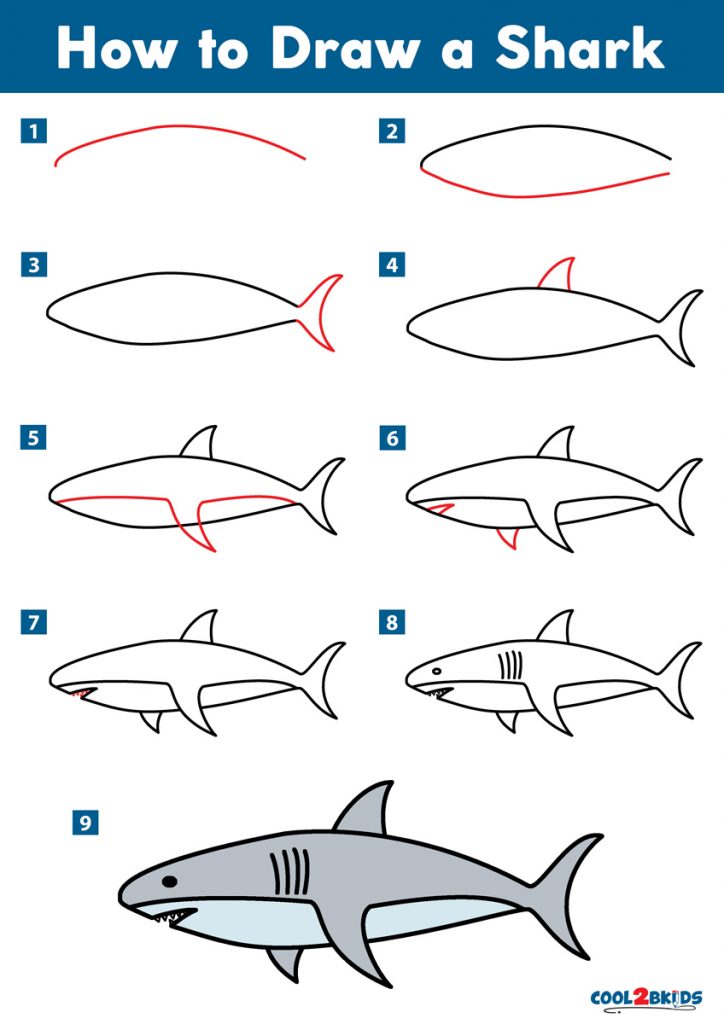
How to Draw a Shark - Cool2bKids
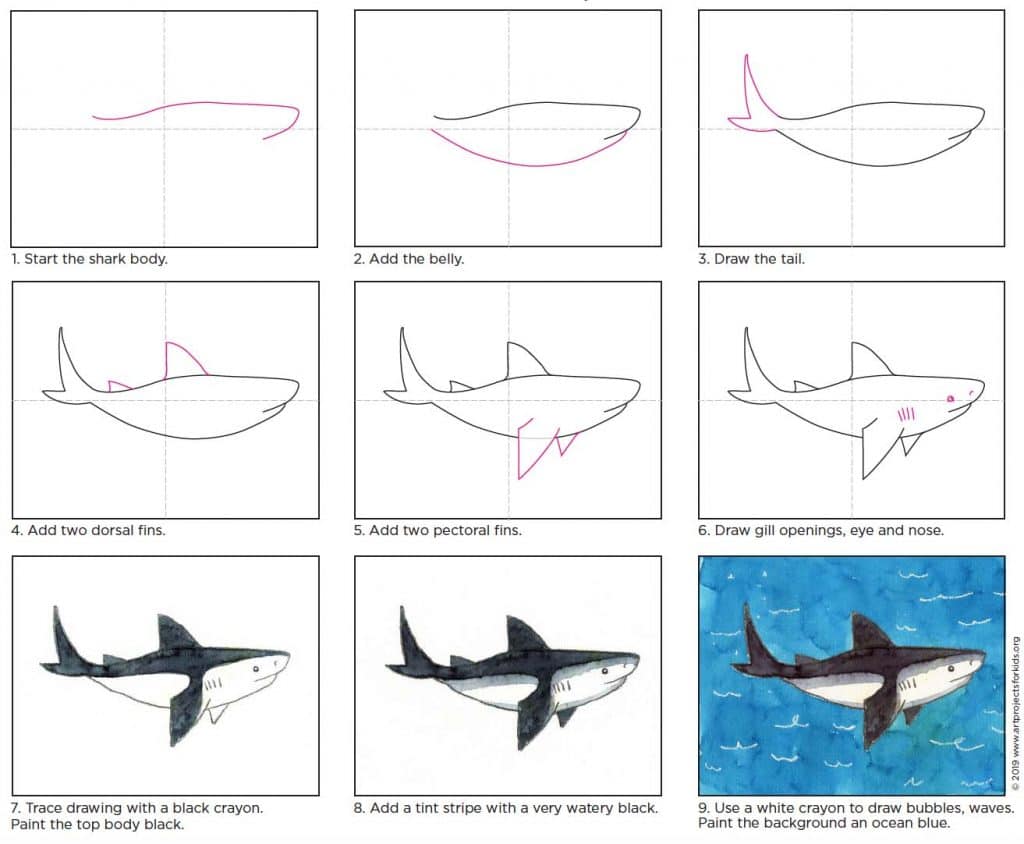
How to Draw a Shark · Art Projects for Kids
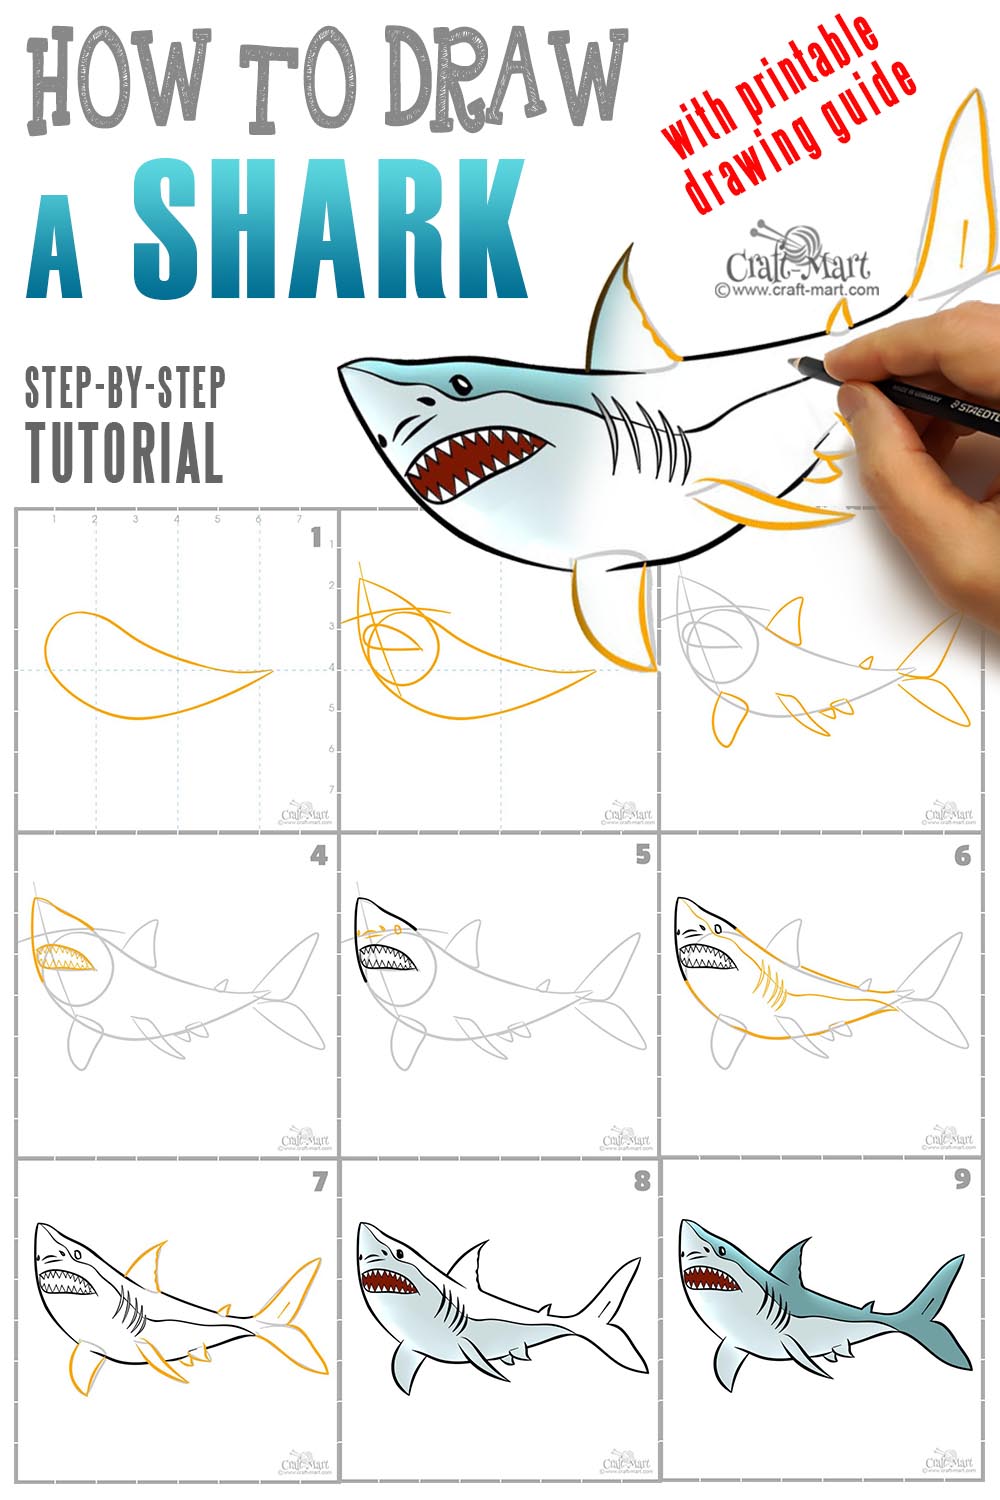
How to draw a shark in 9 easy steps - Craft-Mart
