DIY Balloon Arch: Wow Your Guests On A Budget
Transforming any celebration into an unforgettable event often hinges on striking decorations, and few elements capture attention quite like a vibrant balloon arch. Far from being an exclusive domain of professional decorators, creating a stunning balloon arch DIY is surprisingly accessible and incredibly rewarding. Imagine the gasps of delight from your guests as they walk through a custom-made, colorful gateway that you crafted yourself – all without breaking the bank. This comprehensive guide will empower you to master the art of balloon arch creation, turning your party dreams into a tangible, breathtaking reality.
Whether you're planning a graduation party, a milestone birthday, a baby shower, or a lively backyard celebration, a homemade balloon arch serves as an amazing backdrop for photos and a focal point that ties your entire theme together. The beauty of the DIY approach lies not only in the significant cost savings – with just a few supplies, you can create a stunning party decoration for as little as $20, including balloons – but also in the personal touch you can infuse into every detail. Forget expensive helium tanks or crazy tools; this step-by-step tutorial will show you exactly how to create a stunning balloon arch frame using simple, readily available supplies, ensuring your event is truly one-of-a-kind.
Here's a table of contents to guide you through this exciting DIY journey:
- Why DIY Your Balloon Arch?
- Essential Supplies for Your Balloon Arch DIY
- Crafting Your Balloon Arch Frame
- Mastering Balloon Inflation and Color Palette
- Assembling Your Stunning Balloon Arch
- The Final Touches: Elevating Your Arch
- Securing Your Balloon Arch
- Common Questions About Balloon Arches
- Making a Statement: Events and Celebrations
Why DIY Your Balloon Arch?
The allure of a custom balloon arch is undeniable, but the cost of professional installation can often be prohibitive. This is where the magic of a balloon arch DIY truly shines. The primary advantage is, of course, cost-effectiveness. As mentioned, you can create a substantial and stunning arch for a fraction of the price of a professionally made one, often for under $20. This makes elaborate party decor accessible to everyone, regardless of budget constraints.
Beyond the financial savings, the DIY approach offers unparalleled creative freedom. You have complete control over the color scheme, the size and density of the balloons, and the overall design. This allows you to perfectly match your arch to your party's theme and your personal aesthetic, creating a truly unique and personalized statement. The satisfaction of stepping back and admiring a beautiful decoration that you crafted with your own hands is immense. It's an activity that can even become a beloved tradition, much like "making a balloon arch way is always everyone’s favorite part of our annual neighborhood children’s bike parade & breakfast each 4th of July." While they do take a little time to make, the end result is always amazing and well worth the effort.
Essential Supplies for Your Balloon Arch DIY
Before diving into the creation process, gathering all your tools and materials is crucial. Having everything on hand will make the assembly process smooth and enjoyable. Here are all the tools and materials you may need to make a balloon arch:
- Balloons: This is obviously the star of the show! You'll need a good variety of latex balloons in different sizes (5-inch, 9-inch, 12-inch, 18-inch, etc.) and your chosen color palette. Incorporating different sizes of balloons is what will make your homemade balloon arch look full, beautiful, and take it to the next level.
- Balloon Decorating Strip or Balloon Tape: This is a flexible plastic strip with small holes or slots that allows you to easily attach balloons without tying them together. It's a game-changer for DIY arches.
- Balloon Pump (Electric or Manual): While you can blow up balloons by mouth, a pump will save you immense time and effort, especially for a large arch. An electric pump is highly recommended for speed.
- Scissors: For cutting the balloon decorating strip and any ribbon.
- Balloon Ribbon or Twine: For securing the arch once it's complete.
- Wire Cutters (if using a wire base): Essential for shaping your wire frame.
- Sturdy Wire (for DIY frame): If you're making your own frame from scratch.
- Optional Final Touches: Fresh flowers, greenery, additional ribbon, fairy lights, or even smaller accent balloons for final touches.
Where to Source Your Balloons and Supplies
Finding quality balloons and accessories is easier than ever, with numerous reputable suppliers available both online and in brick-and-mortar stores. For a wide variety and bulk options, consider online retailers. For example, "with over 20 years in business and over 1 million orders shipped, Bargain Balloons is your trusted supplier of quality latex balloons, foil/mylar balloons, and balloon accessories online." They offer a vast selection, allowing you to "explore party balloons for every milestone, holiday, and style."
If you prefer to shop in person or need items quickly, major craft and party supply stores are excellent resources. "Michaels stores have everything you need to create unforgettable balloon decorations for any occasion, from classic latex balloons to shimmering mylar balloons in playful letter and number shapes." Similarly, "visit Party City for balloons of all shapes and sizes, as well as helium tanks and other accessories," making it a convenient one-stop shop. Even large retailers like Walmart offer options, where you can "buy products such as 2 pcs Star Wars balloons BB8 balloons R2D2 balloon The Force Awakens balloon Star Wars party supplies at Walmart and save." For licensed party balloons and giant latex options, "Big Balloon Store is your #1 source for licensed party balloons, giant latex balloons, kids party packs and all mylar balloons for every occasion. All of our stock is updated daily and shipping is fast and free." And for those needing quick delivery of pre-arranged bouquets, "send balloons today with Balloonplanet.com!" or "send festive balloon arrangements and gifts from a skilled local balloon artist in Abita Springs, Louisiana." These varied sources ensure you can find exactly what you need for your balloon arch DIY.
Crafting Your Balloon Arch Frame
The foundation of any successful balloon arch is a sturdy frame. This structure provides the shape and support for your balloons, ensuring your arch stands tall and beautiful throughout your event. You have a few options for creating this essential base.
One common method is to "find or create a wire base." You can "use wire cutters to cut a long piece of sturdy wire to the length and height you want the arch to be." Bend the wire into the desired arch shape. This method offers flexibility in custom sizing. Alternatively, "you can also purchase a balloon arch kit from the store, and use the wire frame from there." These kits often come with pre-shaped frames that simplify the process, especially for beginners. The key is to ensure your chosen frame is robust enough to bear the weight of all the balloons and maintain its shape.
The DIY Backdrop Frame Advantage
For those who frequently host events or want a more substantial and reusable structure, a DIY backdrop frame can be an excellent investment. For this specific balloon arch DIY, "I used my DIY backdrop frame for this arch. It was definitely sturdy enough to handle the job, which was awesome." Building your own frame, perhaps from PVC pipes or wood, provides a durable and versatile base that can be used for countless future decorations, from balloon arches to fabric backdrops. This long-term approach aligns perfectly with the cost-saving and creative spirit of DIY projects, offering a reliable foundation for all your party wow factors.
Mastering Balloon Inflation and Color Palette
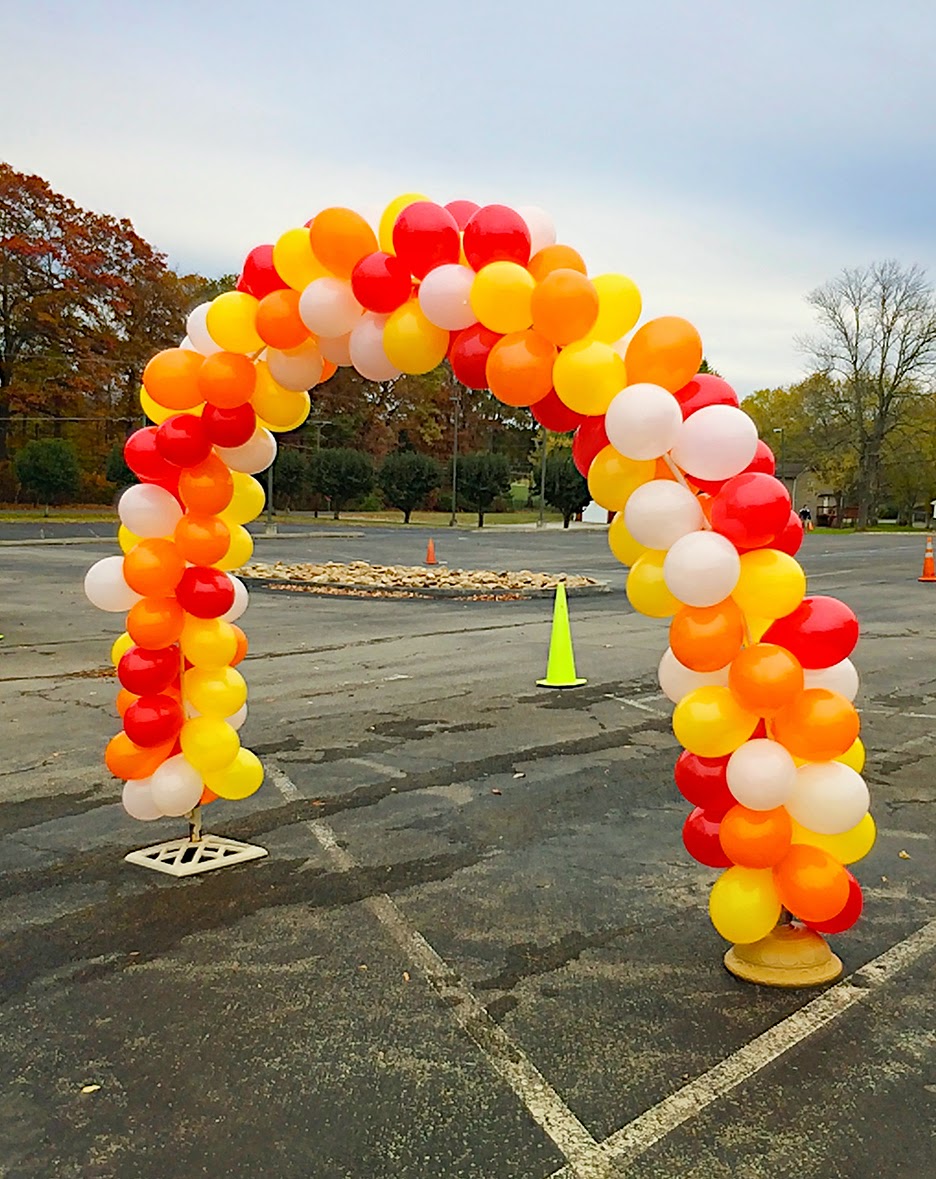
Once your frame is ready, it's time to bring your balloons to life. The secret to a professional-looking balloon arch DIY lies in varying balloon sizes and thoughtfully arranging your colors. "To give your arch variety, blow your balloons up at different sizes." Don't inflate all your 12-inch balloons to their maximum capacity; instead, inflate some fully, some three-quarters full, and some only halfway. This creates depth and a more organic, flowing appearance, making your homemade balloon arch look full and beautiful.
"You should also consider the color palette you’re working with and how you’ll vary each balloon when assembling." This is where your artistic vision comes into play. "You can create your arch to feature a different color every balloon or create small clusters of colors for a more cohesive look." For instance, if you're working with a "navy blue gold balloon" theme, you might alternate navy blue, macaron blue, and metallic gold confetti balloons, or group several blues together followed by a cluster of gold. The goal is to create visual interest and a harmonious blend that complements your event's theme. Experiment with different arrangements on the floor before attaching them to the strip to visualize the final effect.
Assembling Your Stunning Balloon Arch
Now for the most exciting part: putting it all together! The balloon decorating strip is your best friend here. This ingenious tool makes the assembly process incredibly straightforward, allowing you to create a dense and impressive arch without the hassle of individual ties.
Start by inflating a good number of your main balloons in various sizes, as discussed. Then, begin attaching them to the balloon decorating strip. Simply pull the tied neck of each balloon through the larger holes in the strip, then slide it into the smaller, narrower slot to secure it. Alternate the direction of the balloon necks to ensure they lie flat and create a fuller look. Continue adding balloons, pushing them close together to eliminate gaps. The tighter they are, the more professional and robust your balloon arch will appear. Work your way along the entire length of your desired arch, ensuring a consistent density.
Adding Volume and Professional Flair
"Incorporating different sizes of balloons is what will make your homemade balloon arch look full, beautiful, and take it to the next level." As you attach the primary balloons, continuously vary their inflation size. Once your main balloons are attached and the strip is full, it's time for the "final touches with small balloons." Inflate a number of smaller balloons (5-inch or even smaller) and use glue dots or a low-temperature hot glue gun to attach them into any gaps or sparse areas on your arch. These small balloons add incredible depth, texture, and a truly professional finish, making your balloon arch DIY look like it was done by an expert. They fill in any remaining spaces, giving your arch a lush, voluminous appearance.
The Final Touches: Elevating Your Arch
With the main structure of your balloon arch complete, it's time to add those extra elements that elevate it from beautiful to breathtaking. These optional final touches can truly personalize your creation and tie it into your overall party theme.
Consider incorporating elements like "fresh flowers, greenery, or ribbon." For a whimsical garden party, tuck in sprigs of eucalyptus or delicate floral blooms between the balloons. For a more elegant affair, drape satin ribbons or string fairy lights throughout the arch for a magical glow, especially if your event extends into the evening. You can also add themed cutouts, glitter, or even small foil balloons in letter or number shapes to commemorate a birthday or anniversary. The key is to enhance, not overwhelm, the balloons themselves. These thoughtful additions are what will help you "wow your guests with an amazing backdrop" and make your custom balloon arch truly unforgettable.
Securing Your Balloon Arch
Once your arch is fully assembled and adorned, the final crucial step is to secure it properly. A well-secured arch will remain stable throughout your event, preventing any unfortunate collapses and ensuring your hard work pays off.
After you have your main balloons attached to the decorating strip, "cut the balloon decorating strip just past where the balloons end on either side." This ensures a clean finish. "Then, tie a piece of balloon ribbon or twine onto each end" of the strip. These strings will be used to anchor your arch. "Tie those strings onto the piece of furniture you want the arch to go over (or have the strings go to the floor and use balloon weights at the bottom of each)." If you're attaching it to a wall or a dedicated backdrop frame, secure the twine or ribbon to sturdy hooks or the frame itself. For freestanding arches, robust balloon weights are essential at the base of each end to prevent it from tipping over. Double-check that your arch feels stable and secure before the party begins.
Common Questions About Balloon Arches
As you embark on your balloon arch DIY journey, you might have some common questions. Addressing these can help you avoid pitfalls and ensure a smooth, successful project.
One frequent query is, "What is the best backdrop frame to use?" As discussed earlier, a sturdy wire base or a dedicated DIY backdrop frame (like one made from PVC pipes) works wonderfully. The "DIY backdrop frame" is particularly advantageous for its reusability and stability. The best frame is ultimately one that can support the weight of your balloons and maintain its shape without wobbling or collapsing. For smaller, lighter arches, even strong fishing line or a thick string stretched between two anchor points can sometimes suffice, but for a truly impressive and durable arch, a solid frame is recommended.
Is Helium Necessary for a DIY Balloon Arch?
A common misconception about balloon arches is that they require helium to float and maintain their shape. The great news is that "no helium or crazy tools needed!" for this easy DIY balloon arch tutorial. Traditional balloon arches rely on air-filled balloons attached to a structural frame or decorating strip. The balloons are tightly packed together, and the frame provides the necessary support and shape. This is a significant advantage, as helium can be expensive and its lifting power diminishes over time. By using air-filled balloons, your balloon arch DIY will be more cost-effective and can last longer, making it perfect for events that span several hours or even days. You can find all your latex, foil, and helium balloons at various suppliers if you do need helium for other decorations, but it's not a requirement for a successful arch.
Making a Statement: Events and Celebrations
The versatility of a custom balloon arch means it can elevate virtually any occasion. "Now you can make a huge statement at your next event with this easy balloon arch DIY." Whether you're celebrating a significant milestone or just gathering friends and family, an arch adds a touch of festivity and grandeur that guests will remember.
Imagine a vibrant arch welcoming guests to a graduation party, perhaps in school colors, or a whimsical, pastel arch framing the entrance to a baby shower. For a birthday, a personalized arch with number or letter balloons can create an incredible photo booth backdrop. As mentioned, "making a balloon arch way is always everyone’s favorite part of our annual neighborhood children’s bike parade & breakfast each 4th of July," highlighting its appeal for community events. Even for a simple backyard celebration, a custom balloon arch instantly transforms the space into something special. "Use these 5 easy steps to create your own party wow factor with a custom balloon arch that your family will love." The effort, though it takes "a little time to make," truly pays off in the "amazing" end result and the joy it brings to your guests. As @simplyshalese noted, "this balloon arch is so adorable!!" It’s an investment of time that yields incredible visual impact and lasting memories.
In conclusion, creating a balloon arch DIY is a highly rewarding project that offers immense creative freedom and significant cost savings. By following these detailed steps, gathering the right supplies from trusted sources like Bargain Balloons, Party City, or Michaels, and paying attention to details like balloon sizing and color arrangement, you can craft a stunning decoration that will truly "wow your guests." The satisfaction of building something so beautiful with your own hands is unparalleled, and the festive atmosphere it creates is priceless. So, gather your supplies, unleash your creativity, and get ready to make a huge statement at your next event!
Have you tried making your own balloon arch? Share your tips, tricks, and photos in the comments below! Don't forget to share this guide with anyone planning a party, and explore our other DIY decoration tutorials for more inspiration.
- Josies On A Vacation Far Away
- Ceo Of Kidz Bop
- Masajes Con Finales Felices
- Acubi Dress To Impress
- 30 Dollar Website
Easy DIY Balloon Arch (For Around $10!) – Less Than Perfect Life of Bliss

How To Make A Balloon Arch (Easy DIY Balloon Garland) - Darling
Easy DIY Balloon Arch Ideas for Your Next Party • OhMeOhMy Blog
