Mastering The Flames: Your Ultimate Guide To How To Draw Fire
Have you ever found yourself mesmerized by the dancing, flickering beauty of a flame, wishing you could capture its elusive essence on paper? Learning how to draw fire can seem like an intimidating challenge, but with the right guidance, it's an incredibly rewarding skill to master. This comprehensive guide will break down the complex dynamics of fire into manageable steps, transforming your artistic aspirations into vibrant, fiery realities.
From the subtle glow of embers to the furious roar of a bonfire, fire is a symbol of warmth, destruction, and transformation, making it a captivating subject for artists. If you have been looking for a tutorial on how to draw fire that truly demystifies the process, you have most certainly come to the right place. We’ll explore not just the mechanics of drawing, but also the artistic principles that give your fire drawings life, depth, and a realistic glow.
Table of Contents
- The Dynamic Essence of Fire in Art
- Essential Materials for Drawing Fire
- Understanding the Anatomy of a Flame
- How to Draw Fire Step-by-Step: A Detailed Tutorial
- Coloring and Shading Your Fire Drawing
- Drawing Fire from Imagination and Different Styles
- Common Challenges and How to Overcome Them
- Practice and Exploration: Your Artistic Journey
The Dynamic Essence of Fire in Art
Fire is not a static object; it's a living, breathing entity that constantly shifts and changes. Drawing flames requires patience and practice, as it involves capturing the elusive, transient nature of fire with accuracy, depth, and an understanding of its dynamic essence. This dynamism is what makes it both challenging and incredibly rewarding to draw. We will break down the concepts of how flames interact with the wind and therefore cause these sporadic oscillations within the structure of the flame drawing. Understanding these underlying principles is key to creating a realistic and believable depiction.
The beauty of fire lies in its unpredictability and its vibrant color palette, ranging from deep reds and oranges to brilliant yellows and even hints of white and blue. Fires and their flames are dynamic, which can make them seem daunting to render. However, by focusing on its core characteristics – its upward movement, its irregular shapes, and its luminosity – you can begin to deconstruct its complexity into manageable elements. This full tutorial aims to equip you with the skills to tackle this exciting subject.
Essential Materials for Drawing Fire
Before we dive into the specifics of how to draw fire, let's ensure you have the right tools. While you can certainly learn how to draw fire with a pencil, having a range of materials can open up more possibilities for color and effect. Here’s a basic list:
- **Pencils:** A range of graphite pencils (HB, 2B, 4B, 6B) for sketching and shading. Here you can figure out how to draw fire with a pencil, starting with lighter lines and building up darkness.
- **Eraser:** A kneaded eraser is excellent for lifting graphite and creating highlights without smudging.
- **Paper:** Good quality drawing paper that can handle multiple layers of graphite or color.
- **Colored Pencils/Markers/Pastels (Optional but Recommended):** To add vibrant colors. Reds, oranges, yellows, and even some blues and purples for shadows or hotter parts.
- **Blender/Smudge Stick (Optional):** For smooth transitions in shading.
- **Reference Pictures:** Crucial for understanding how real fire behaves. While this tutorial teaches you how to draw fire from your imagination, referencing real flames helps build your visual library.
Understanding the Anatomy of a Flame
In this tutorial on how to draw fire, we will first break down the shape and flow of how a flame is formed. Fire is not a solid object; it's a phenomenon. Each flame has a distinct structure, even though it's constantly moving. Recognizing these components will significantly improve your ability to draw realistic fire.
- Livvy Dunne Deepfake
- Turkish Quandale Dingle
- Chris Brown Kids
- Ms Rachel Potty Training
- 30 Dollar Website
The Base and Body of the Flame
The base of the fire is where the fuel source meets the flame. It's often wider and more intense. As the flame rises, it narrows and forms the main body. Fire flames are not symmetrical, so make sure your lines are fluid and organic. This organic quality is what makes fire look alive. The body of the flame is where most of the heat and light emanate from, often appearing brightest at its core.
The Tips and Flickers
The tips of the flames are the most volatile parts, often appearing as sharp, dancing points. These are the parts that seem to reach out and "flicker." For this step, we will be adding in some small flickering details. These small, sporadic movements are crucial for conveying the transient nature of fire. The air currents and the consumption of fuel cause these tips to constantly change shape and direction.
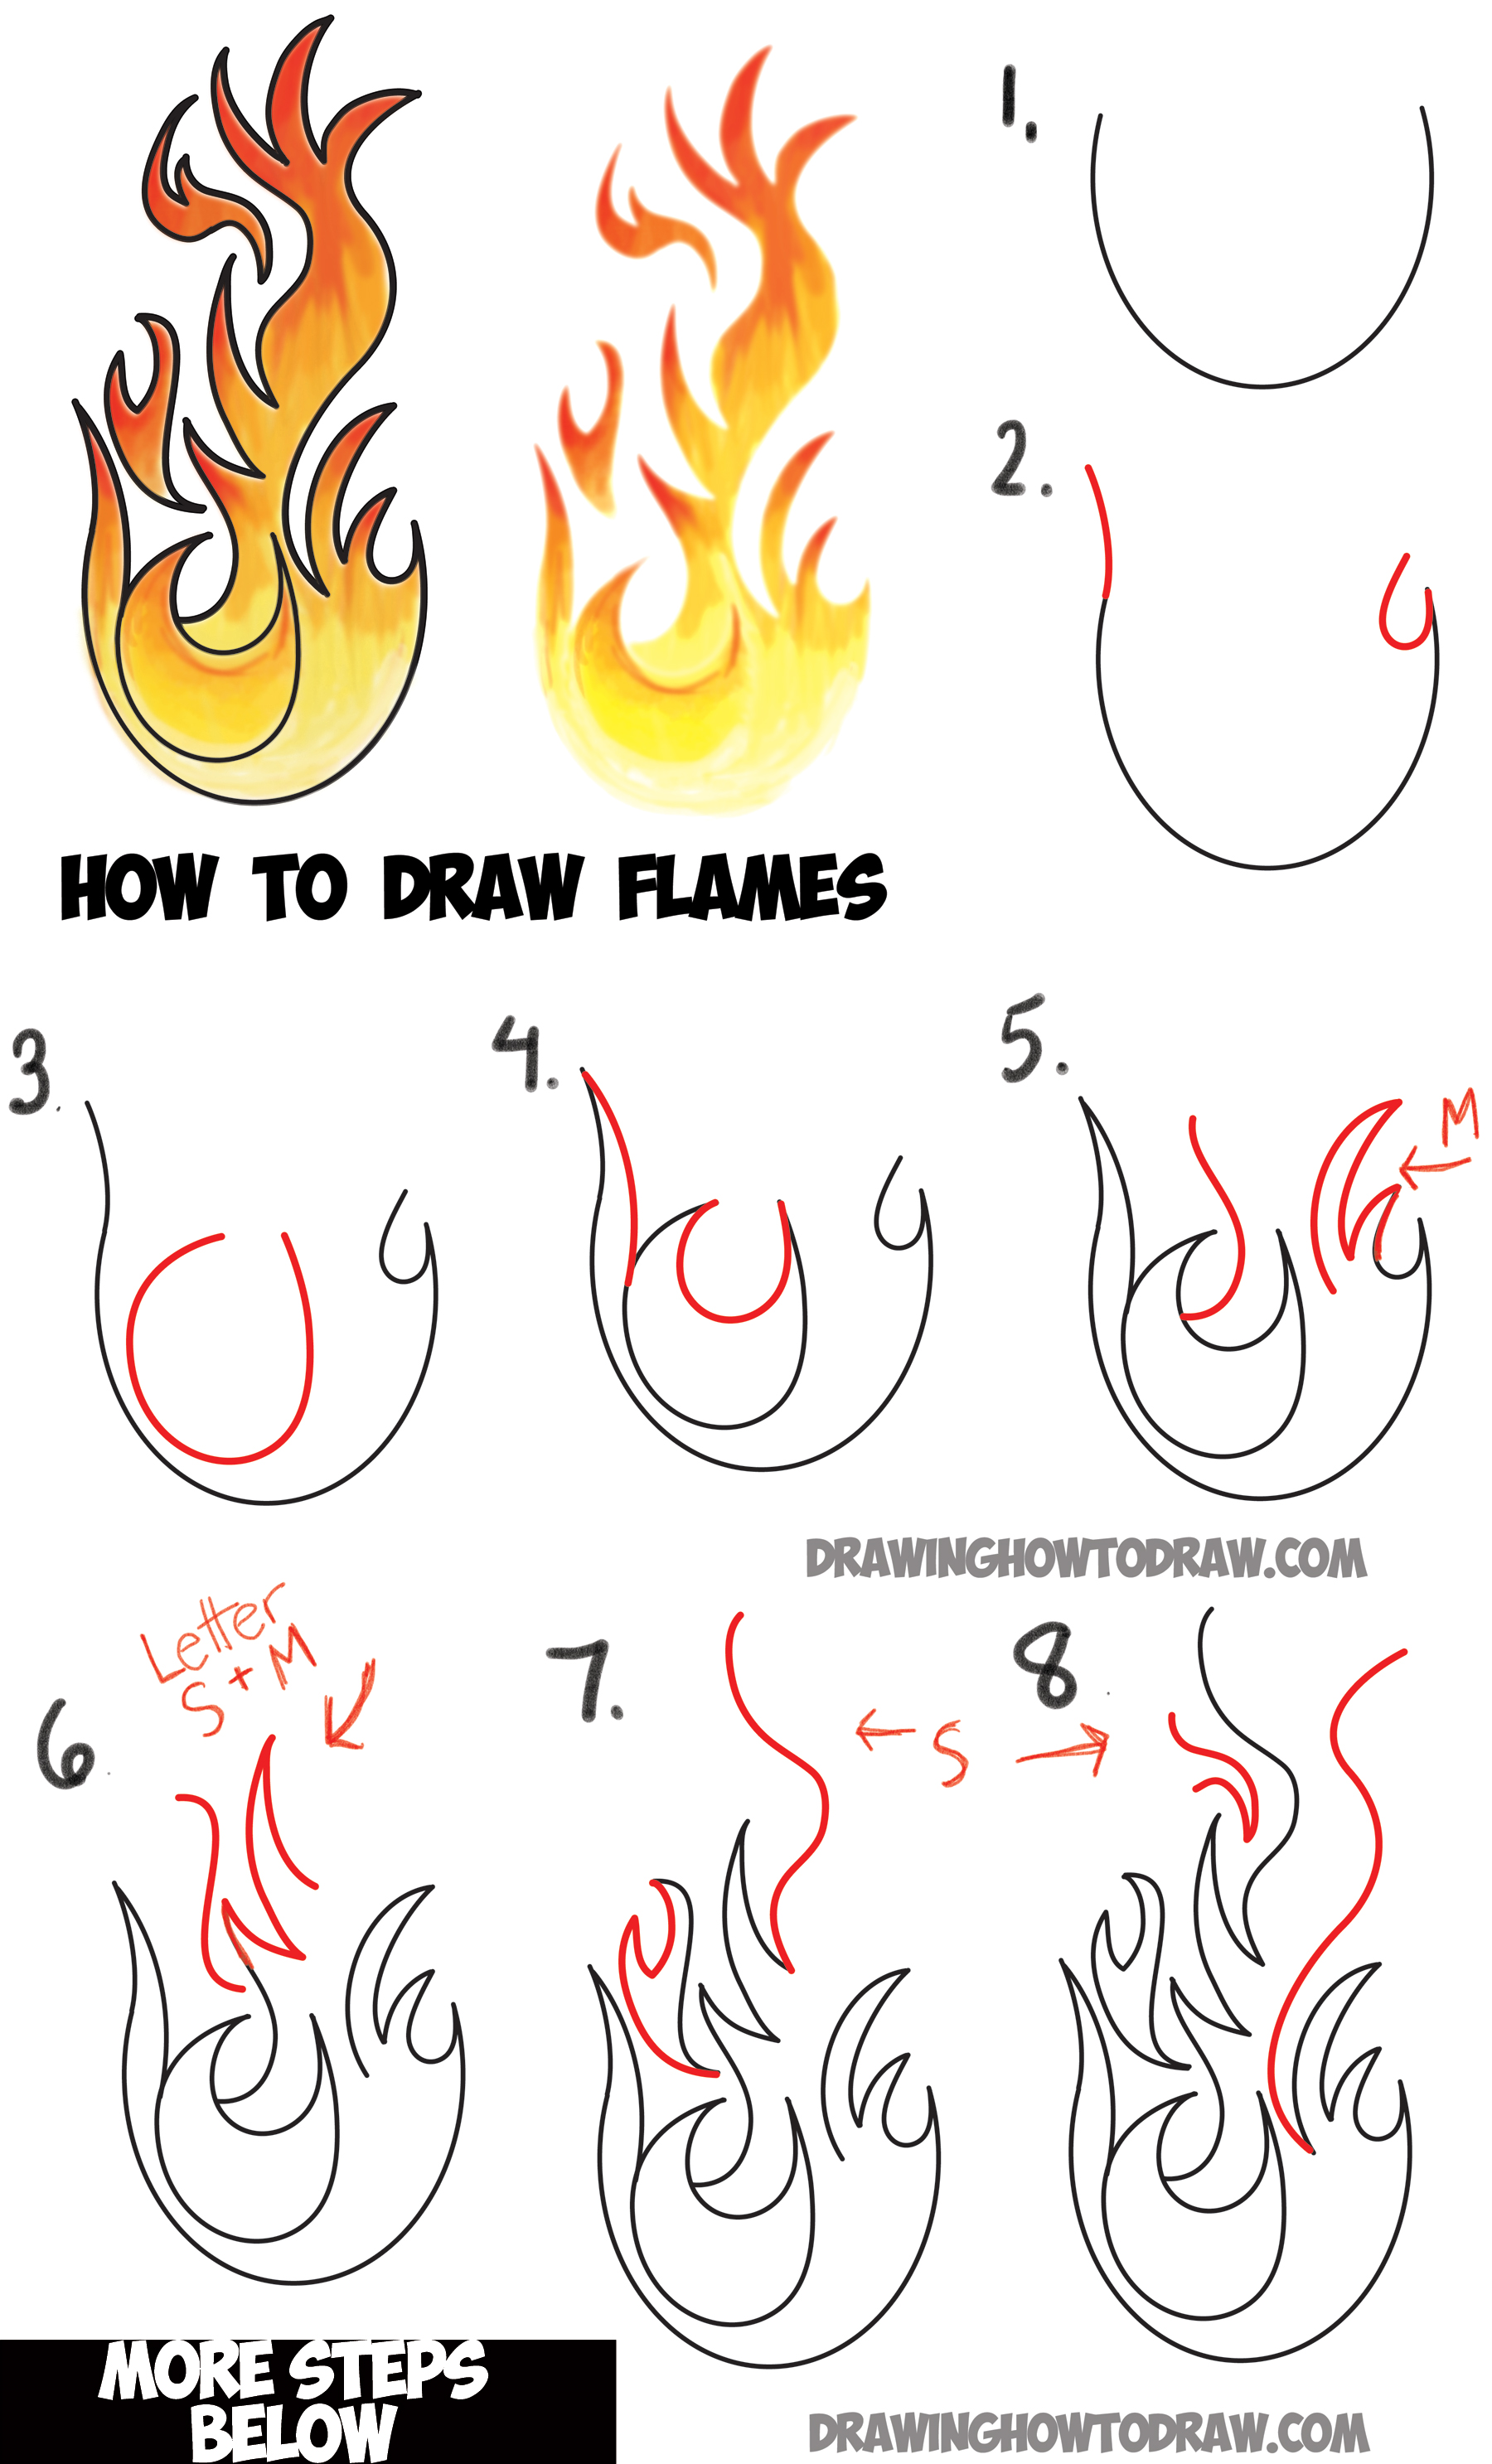
How to Draw Fire Step-by-Step: A Detailed Tutorial
Now, let’s learn how to draw fire step by step. This easy guide shows you how to use simple shapes, colors, and shading techniques. Follow these steps and see the reference picture (imagine one in your mind or use a real one) to create your own fire drawing. This drawing tutorial will teach you a simple method for making fire shapes completely from scratch, building confidence in your #drawingskills.
Step 1: The Foundation – A Wavy Base
1️⃣ Start by drawing a wavy, irregular shape for the base of the fire. Think of it as a loose, organic blob from which the flames will sprout. This initial shape doesn't need to be perfect; its irregularity is key to mimicking natural fire. Remember, fire flames are not symmetrical, so make sure your lines are fluid and organic from the very beginning. This will set the tone for a dynamic and realistic fire drawing.
Step 2: Defining the Outer Contours
To start learning how to draw fire, begin by sketching a smooth, curved line on the left side. This will form the outer contour of the flame. The curve can be slightly irregular to mimic the natural movement of fire. Keep the shape flowing upward, as fire always rises. Now, draw the left border of fire, then repeat this process for the right side, ensuring the overall shape tapers towards the top. These lines define the general silhouette of your flame.
Step 3: Adding the First Points of Flare
In the second step of this fire drawing tutorial, we will draw the first points of the flame’s flare. These are the initial, larger "tongues" of flame that rise from the base. Each point of flare should dip outwards and then inwards while curving sharply towards the pointed part. Think of them as soft, elongated teardrop shapes that are slightly distorted by movement. Vary their heights and widths to add to the natural, chaotic look of fire.
Step 4: Introducing Inner Flames and Movement
Now, we'll add more complexity and movement within the main flame structure. Draw the tip of the fire, but don't just stop there. Within the larger outer contours, start sketching smaller, interlocking flame shapes. These inner flames should follow the general upward flow but also have their own individual curves and flicks. They help create the illusion of depth and the layered appearance of real fire. Some might overlap, some might seem to be emerging from behind others. This is where the #drawingchallenge truly comes alive, as you capture the fluidity.
Step 5: Refining Details and Flickering Elements
Your fire drawing is almost complete, and just needs a few final details to bring it to life. For this step, we will be adding in some small flickering details. To do this, you can draw in a few shapes that are similar to the very first shape you drew in step 1, but much smaller and higher up, breaking away from the main body of the flame. These little "sparks" or detached flickers add a sense of energy and realism. You can also add very thin, wispy lines to suggest smoke or heat rising from the flame. This attention to minute details is what elevates a good drawing to a great one.
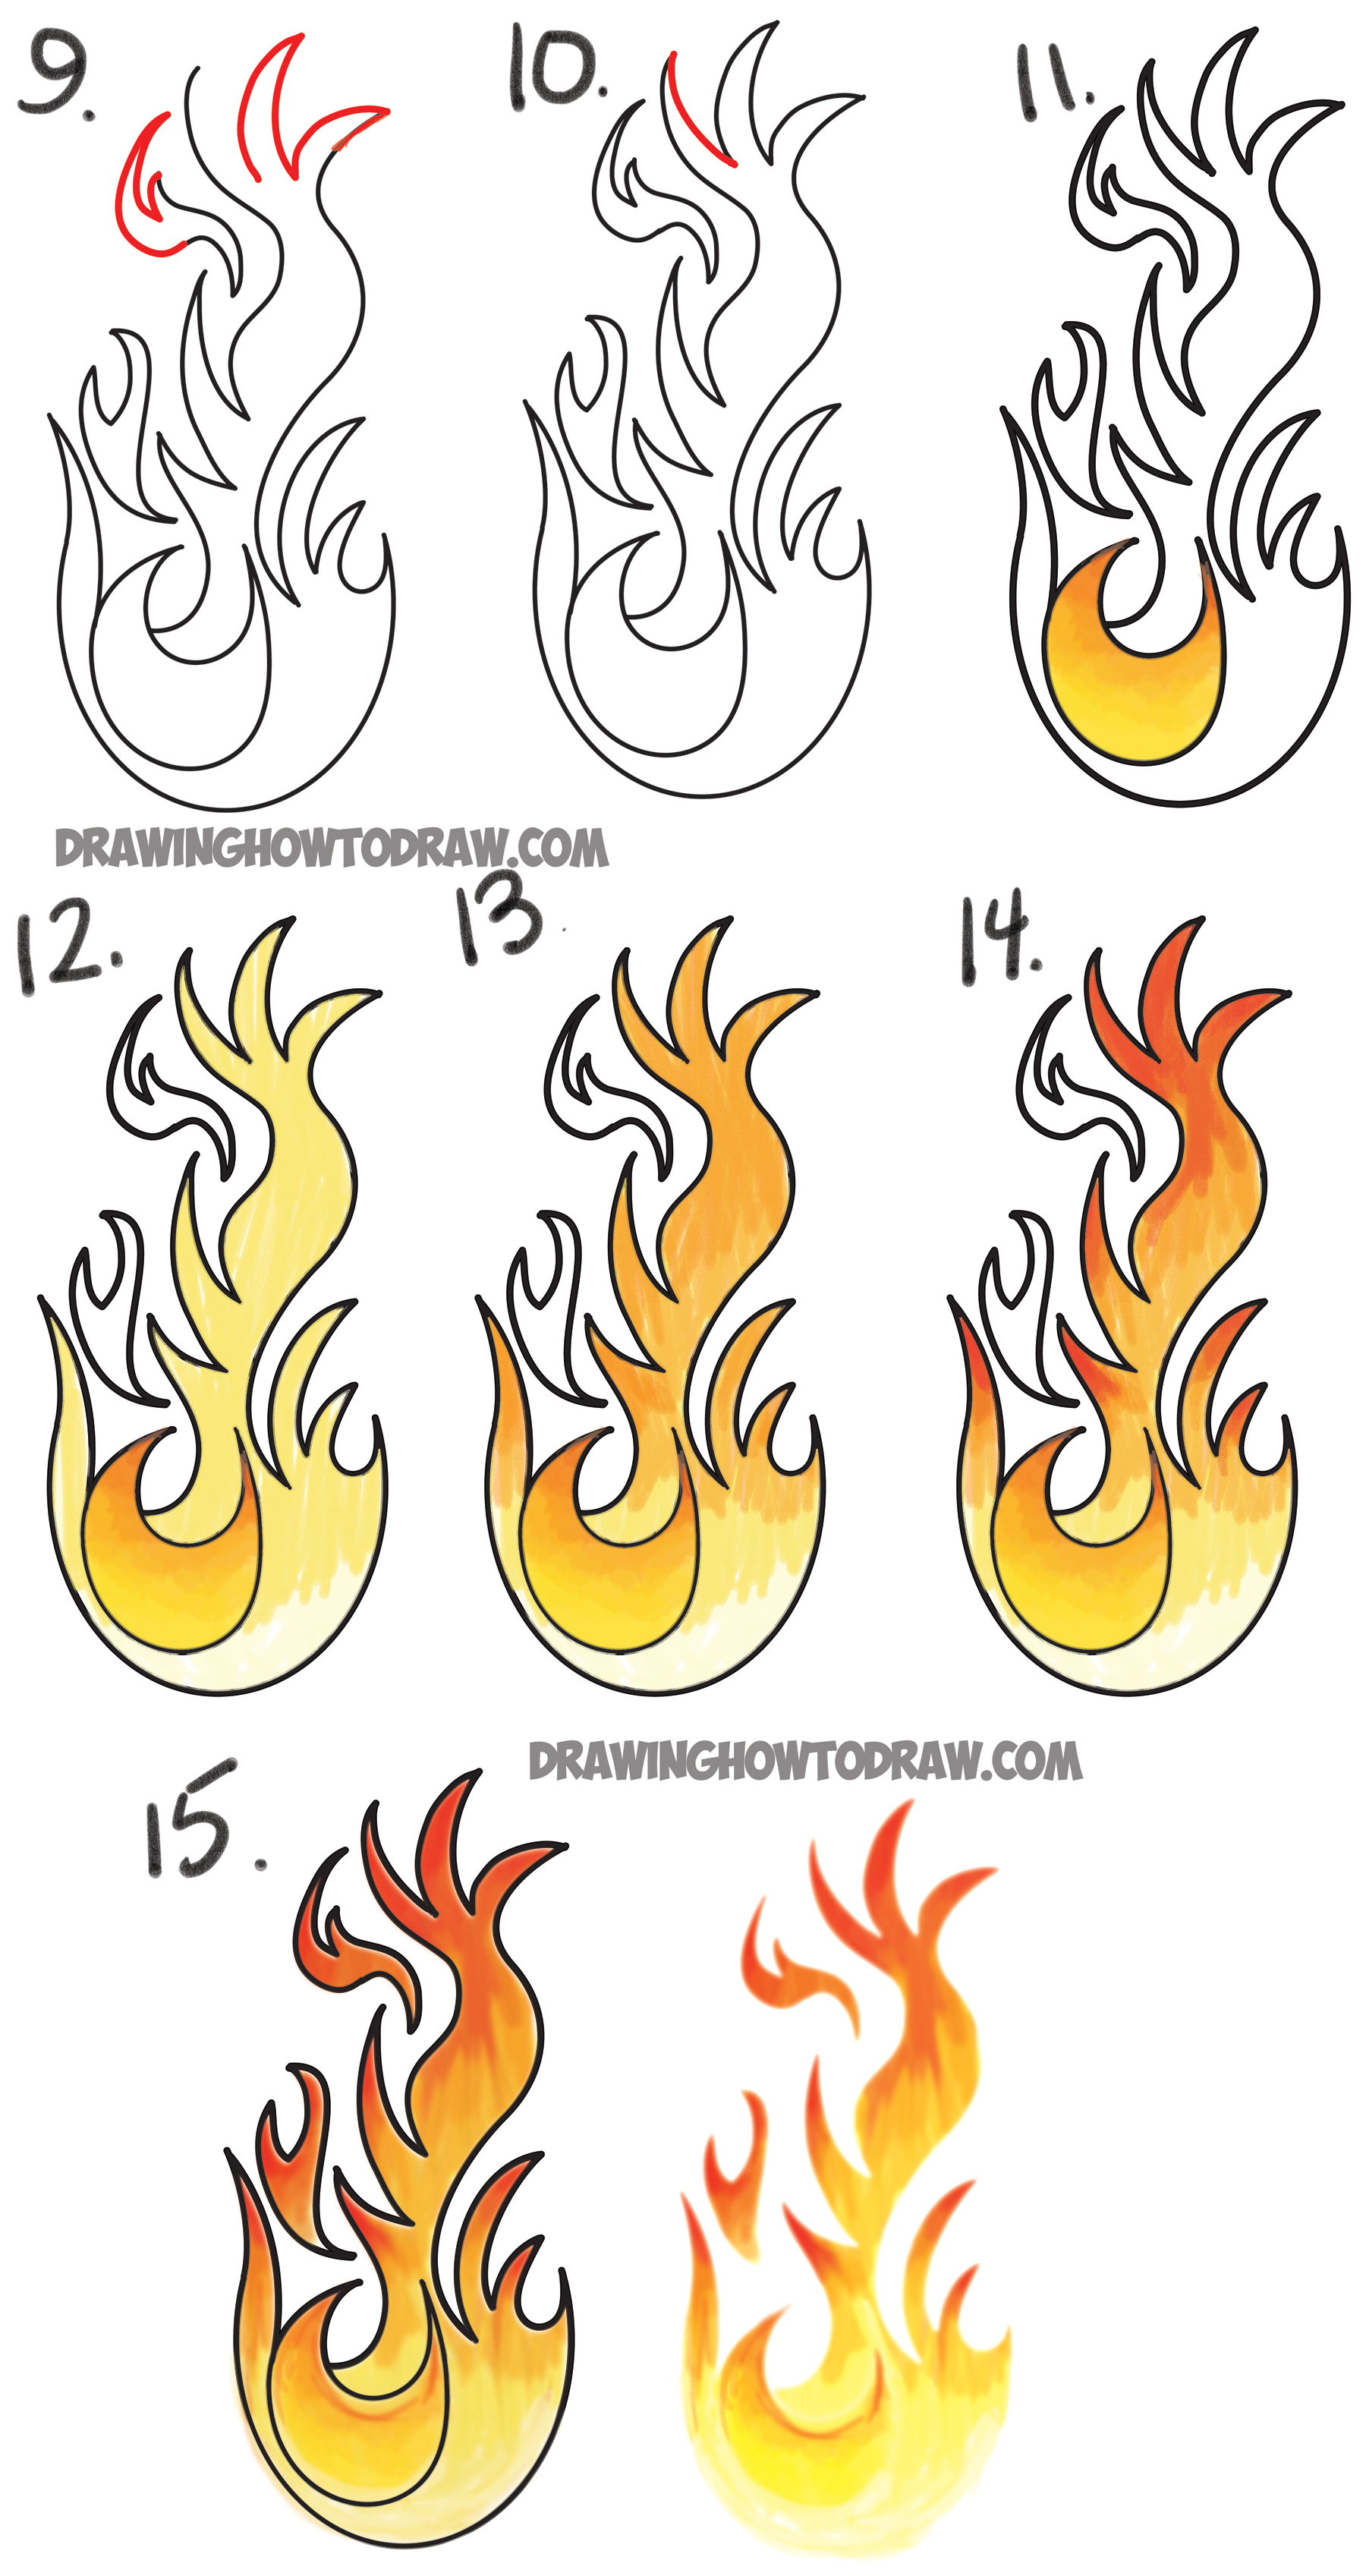
Coloring and Shading Your Fire Drawing
Once you have the basic structure down, coloring and shading are crucial for making your fire drawing truly realistic and vibrant. This is where you bring the heat to your artwork!
- **The Core:** The hottest part of the flame is usually the brightest and often appears white or light yellow. Start by coloring the innermost areas with your lightest color.
- **Mid-tones:** As you move outwards from the core, transition to yellows, then oranges. Layer your colors gently, building up intensity.
- **Outer Edges:** The outermost parts of the flame, which are cooler, will typically be red or even a dark reddish-brown. Some artists even incorporate hints of blue or purple in the very hottest, most intense parts of the flame's base, or in the smoke.
- **Shading for Depth:** Use shading to give your flames volume. The parts of the flame that are closer to the light source (the core) will be brighter, while areas further away or those that are curving inwards will be slightly darker. Think about how light wraps around a form.
- **Glow Effect:** To create a convincing glow, lightly color the area immediately surrounding your fire with a faint yellow or orange, fading it out as it moves away from the flame. This simulates the light cast by the fire onto its surroundings.
- **Smoke:** Explore different styles, colors, and effects of fire and smoke in art. Smoke typically rises from the top of the flame, often in swirling, grey or black patterns. It should be less defined than the flames, appearing wispy and ethereal.
Remember, the key to realistic fire is smooth color transitions and an understanding of how light behaves. Don't be afraid to experiment with layering different colors to achieve rich, complex hues.
Drawing Fire from Imagination and Different Styles
While reference pictures are invaluable for learning, the ultimate goal for many artists is to know how to draw fire from your imagination. This involves internalizing the principles we've discussed: the upward flow, the irregular shapes, the color gradients, and the flickering details. Practice observing real flames and mentally breaking them down into their component shapes and movements. This mental exercise builds your visual library.
Beyond realism, fire can be stylized in countless ways. With these easy fire, flames, and fireballs drawing ideas, you can learn how to draw fire, flames, and fireballs in a very short time. For instance, drawing a fire with pencil (option 4) we begin work with the cartoonish image, which simplifies shapes and uses bold outlines. Kids Art Hub is a YouTube channel where your kids can find a lot of drawing tutorials and animated drawing lessons were designed for children of all ages, often featuring simplified, expressive fire. Don't limit yourself to just one style; experiment with:
- **Cartoon Fire:** Exaggerated shapes, bold outlines, often simplified colors.
- **Fantasy Fire:** More elaborate, magical, or destructive in appearance, often with unique color palettes.
- **Abstract Fire:** Focusing on the colors and movement without strict adherence to realistic form.
- **Minimalist Fire:** Using just a few lines or shapes to suggest fire.
Each style offers a unique way to express the power and beauty of flames. The #drawingtutorial you've followed here provides a solid foundation from which to branch out into these diverse artistic explorations.
Common Challenges and How to Overcome Them
Although drawing fire can be an intimidating process, hopefully, you now know the basics of fire drawing and know how to draw flames easily and realistically! However, you might encounter some common hurdles. Here's how to tackle them:
- **Stiff, Symmetrical Flames:** Fire is organic. Combat stiffness by consciously making your lines wavy, irregular, and asymmetrical. Avoid drawing perfect mirrored shapes.
- **Flat Appearance:** This often comes from a lack of proper shading and color layering. Use a full range of values (light to dark) and layer your colors to create depth and luminosity. Remember the core is brightest.
- **Lack of Movement:** Fire is dynamic. Incorporate those flickering details, wisps of smoke, and varying heights and widths of your flame points. Imagine the wind interacting with the flame.
- **Unconvincing Glow:** The glow is critical. Ensure you're extending light beyond the flame itself and fading it out. Consider the surfaces around the fire – how would they be illuminated?
- **Overthinking:** Sometimes, the best way to improve your #drawingskills is to just draw! Don't be afraid to make mistakes; they are part of the learning process.
Practice and Exploration: Your Artistic Journey
As a result, a live fire with firewood is ready in the picture, but your journey doesn't end there! Drawing flames requires patience and practice. The more you draw, the more intuitive the process becomes. Consider these ideas for continued improvement:
- **Daily Sketching:** Make drawing fire a regular #drawingchallenge. Even quick 5-minute sketches can help you internalize the shapes and movements.
- **Observe Real Fire:** Safely observe campfires, candles, or even videos of fire. Pay attention to how the flames move, how the colors shift, and how light interacts with smoke.
- **Experiment with Mediums:** Try drawing fire with charcoal, pastels, acrylics, or digital art software. Each medium offers unique properties that can enhance your fire drawings.
- **Study Other Artists:** Look at how master artists, both traditional and digital, depict fire. What techniques do they use? How do they convey intensity and movement?
- **CraftBuds Full Tutorial:** Seek out other comprehensive tutorials or online courses if you want to delve deeper into specific aspects of fire drawing, like special effects or different types of fires (e.g., explosions, magical fire).
Now that we have come to the end of the flame drawing tutorial, we hope that you are happy with your fire sketch and that you feel more comfortable with drawing fire. You've gained the foundational knowledge to create stunning, realistic flames. The principles of form, light, and movement that you've applied to fire are transferable to countless other drawing subjects, enhancing your overall artistic capabilities. Keep practicing, keep exploring, and let your creativity burn bright!
What kind of fire will you draw next? Share your thoughts and creations in the comments below! Don't forget to share this guide with fellow aspiring artists, and check out our other drawing tutorials for more artistic adventures!
How to Draw Flames and Drawing Cartoon Fire Drawing Tutorial – How to
How to Draw Flames and Drawing Cartoon Fire Drawing Tutorial – How to

How to Draw Flames: 14 Steps (with Pictures) - wikiHow
