Unlock Your Inner Artist: How To Draw A Butterfly With Ease
Table of Contents
- Why Learn How to Draw a Butterfly?
- Essential Supplies for Your Butterfly Drawing Journey
- Mastering the Basics: Simple Steps to Draw a Butterfly
- Drawing a Monarch Butterfly: A Detailed Guide
- Adding Intricate Details: Antennae and Wing Patterns
- Bringing Your Butterfly to Life with Color
- Tips for Beginners and Aspiring Artists
- Beyond the Basics: What's Next in Your Drawing Journey?
Why Learn How to Draw a Butterfly?
Beyond the sheer joy of creation, there are numerous reasons why learning how to draw a butterfly is a valuable skill. As mentioned, butterflies have been a muse for artists for millennia, proving their enduring aesthetic appeal. Their intricate designs and graceful forms make them a fantastic subject for developing your drawing skills, particularly in areas like symmetry and pattern work. For aspiring artists, mastering butterfly anatomy helps build a strong foundation in observational drawing. The process of breaking down a complex subject into simpler shapes is a fundamental skill that translates to drawing anything else. Moreover, the act of drawing itself is incredibly therapeutic. This tutorial is perfect for beginners as well as anyone looking to relax and experiment with their artistic side. But the appeal of knowing how to draw a butterfly extends beyond personal enjoyment. Butterfly logos are common, and there are many ways to portray them, making this skill valuable even for a graphic designer working with brands. Whether for fine art, illustration, design, or simply a calming hobby, the ability to sketch a beautiful butterfly is a versatile and rewarding talent.Essential Supplies for Your Butterfly Drawing Journey
One of the best things about learning how to draw a butterfly is that you don't need a vast array of expensive materials to get started. Simplicity is key, especially for beginners. You can use any kind of drawing supplies to create a butterfly drawing, but here are some recommendations to ensure you have a great experience: * **Paper:** A standard sheet of drawing paper or even plain printer paper will do. For more serious work, consider paper with a slightly heavier weight (e.g., 80lb or 100lb) which can better handle erasing and layering. * **Pencils:** * **Graphite Pencils:** A basic HB pencil is a great all-rounder for sketching. For creating a greyscale tonal piece, stick to a soft graphite pencil, such as a 2B, 4B, or 6B, which allows for darker tones and smoother shading. * **Eraser:** A good quality kneaded eraser or a plastic eraser will be invaluable for making corrections and lightening lines without damaging your paper. * **Optional - For Colored Drawings:** * **Colored Pencils:** For colored pencil drawings, here are some recommendations: Faber-Castell Polychromos, Prismacolor Premier, or Derwent Coloursoft are excellent choices, offering rich pigments and smooth application. Even a basic set of student-grade colored pencils can yield beautiful results. * **Blender Pencil/Stomp:** These can help you achieve smooth color transitions and blend colors seamlessly. Remember, the goal is to have fun and learn. Don't let a lack of "professional" supplies deter you. Grab a piece of paper, a pencil, and get ready to have fun!Mastering the Basics: Simple Steps to Draw a Butterfly
For complete beginners, we also have an easy drawing ideas blog with step-by-step tutorials, and this guide builds on that foundation. Learning how to draw a simple butterfly using pencils and paper with this easy tutorial will provide you with the fundamental skills before diving into more complex details. This section outlines a series of simple steps to start your butterfly sketch in no time, making it an easy and fast step-by-step tutorial for kids, teens, and adults alike. The key to any successful drawing is to start light and build up your lines. Always draw lightly with pencil first on a sheet of drawing paper. This allows you to easily erase mistakes and refine your shapes as you go.Centering Your Butterfly on the Page
Before you even start drawing the butterfly's form, a simple trick will help you center the butterfly in the middle of your paper. Lightly draw a vertical line down the center of your paper and a horizontal line across the middle, forming a cross. This cross will serve as a guide for symmetry and placement, ensuring your butterfly isn't awkwardly off-center. You can erase these guide lines later.Starting with Basic Shapes: Head and Body
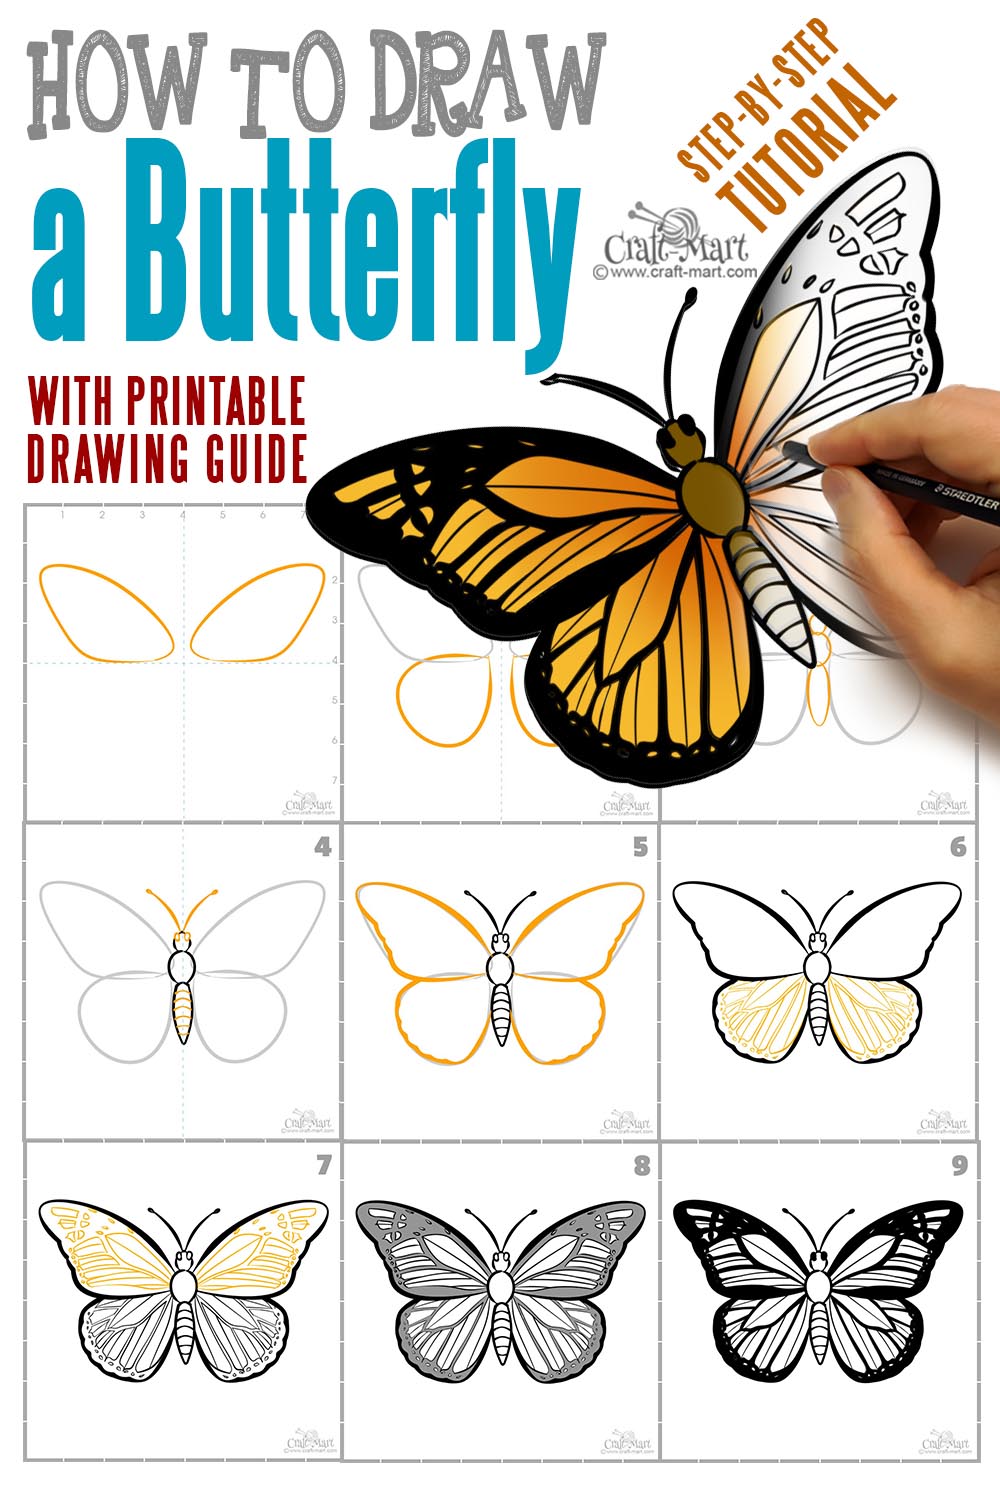
All complex forms can be broken down into simpler geometric shapes. The butterfly is no exception. 1. **Head:** Draw a circle for the butterfly's head section at the top of your vertical centerline. This circle doesn't need to be perfect; it's just a guide. One way to draw a butterfly is by starting with a small circle for the head. 2. **Abdomen:** Below the head, draw an oval shape that's a little longer for the butterfly's abdomen. This oval should extend downwards along your vertical centerline. The body of the butterfly is generally elongated and slender. 3. **Thorax (Optional Detail):** While not always a distinct shape at this stage, the thorax is the section between the head and the abdomen where the wings attach. You can subtly define this area as a slightly wider part of the oval or a separate, smaller oval connected to the head. At this point, you have a simplified body structure that forms the central axis of your butterfly.Drawing a Monarch Butterfly: A Detailed Guide
Now that you have the foundational body, let's dive into drawing a monarch butterfly, known for its striking orange and black patterns. We'll create a monarch butterfly, but you can also modify my method to draw any other butterfly by simply changing the wing shape and pattern in later steps. Follow along with us and learn how to draw a monarch butterfly! This section goes along with my step-by-step monarch butterfly painting tutorial, so you can easily transition from drawing to coloring.Crafting the Butterfly's Body: Head, Thorax, and Abdomen
Refine the initial circle and oval to draw the butterfly's head, thorax, and abdomen more accurately. The head should be a neat circle, the thorax a slightly wider, rounded segment just below the head, and the abdomen a longer, tapering oval. Connect these three sections smoothly to form the main body. For a monarch, the body is relatively slender.Sketching the Wings: Achieving Symmetry
This is where drawing butterflies can be kind of tricky because you need to repeat the same exact lines so they are symmetrical (mirror image) on both sides. The central vertical line you drew earlier will be your best friend here. 1. **Top Wings (Forewings):** From the thorax, sketch the top wing of the butterfly. Monarch butterflies have large, somewhat triangular forewings with rounded tips. Draw one wing on the left side, extending outwards and slightly upwards from the body. Then, mirror this shape precisely on the right side. Pay close attention to the angle and curve to ensure symmetry. Learn how to draw a butterfly with a simplified body and round wings, but for a monarch, the wings are a bit more angular than perfectly round. 2. **Bottom Wings (Hindwings):** Below the top wings, sketch out the bottom wings. Monarch hindwings are more rounded or oval-shaped, extending downwards and outwards from the abdomen. Again, draw one on the left and then mirror it perfectly on the right. Ensure the connection points to the body are accurate. In just 9 steps, we show you how to draw a beautiful butterfly with its wings fully expanded, and getting these initial wing shapes right is crucial. Remember to draw lightly. If your first attempt isn't perfectly symmetrical, that's okay! Erase and try again. Practice makes perfect.Adding Intricate Details: Antennae and Wing Patterns
Once the basic body and wing shapes are established, it's time to add the defining features that make your butterfly truly come alive. This is where you learn how to draw a detailed butterfly step by step, right from scratch. 1. **Antennae:** Draw 2 curved lines coming off the top of the head with a swirl at each end for the antennae. Make the line on the left side of the head curve out to the left, and make the line on the right side of the head curve out to the right, maintaining symmetry. These should be delicate and thin. Alternatively, you can draw 2 long lines extended from the head with very small ovals at the end for the antennae. 2. **Wing Veins (Cells):** Butterflies have a network of veins on their wings that form distinct "cells." Follow the steps to create the body, wings, cells, and patterns of a monarch butterfly. For a monarch, these veins radiate from the base of the wing outwards. Lightly sketch these lines, remembering to keep them symmetrical on both sides. These veins will help define where your patterns go. 3. **Intricate Patterns:** Now, add an intricate pattern to the wings. Monarch butterflies are famous for their black veins and borders, with small white dots along the edges. * Start by darkening the main veins you sketched. * Then, draw a thick black border around the outer edge of all four wings. * Within this black border, add a series of small white (or uncolored, if using pencil) dots. These are typically more prominent on the forewings. * You can also add a few additional black markings or smudges within the orange areas, as seen on real monarchs. * Remember to keep the patterns symmetrical. It's like drawing a mirror image. Take your time with the patterns. The more detail you add, the more realistic and captivating your butterfly drawing will become.Bringing Your Butterfly to Life with Color
Adding color is arguably the most exciting part of the process, as it truly brings your butterfly drawing to life. Follow the easy guide and color your butterfly drawing with bright and soft colors. For a monarch, the primary colors are vibrant orange, deep black, and crisp white. 1. **Orange:** Use a bright orange for the main body of the wings, filling in the areas between the black veins and borders. You can use varying pressure with your colored pencils to create areas of lighter and darker orange, adding depth. 2. **Black:** Carefully fill in the veins and the outer borders with black. You can use a fine-tipped black pen or a sharp black colored pencil for precision. 3. **White:** The small dots along the black border should remain white. If you're using white paper, simply leave these areas uncolored. If you're working on toned paper, you might use a white colored pencil or gel pen to make them pop. 4. **Body Color:** The body of a monarch butterfly is typically black with some white spots. Color the head, thorax, and abdomen accordingly. 5. **Shading (Optional):** To make your butterfly look three-dimensional, consider adding subtle shading. For instance, the areas of the wings closest to the body might be slightly darker, or you can add a hint of shadow under the body to make it appear lifted from the paper. You can use any kind of drawing supplies to create a butterfly drawing, and feel free to color it with your favorite colors, even if you're not going for a realistic monarch. This is your chance to use your own creativity to make each butterfly unique!Tips for Beginners and Aspiring Artists
Drawing, like any skill, improves with practice and patience. Here are some additional tips to help you on your journey to master how to draw a butterfly: * **Start Simple:** Don't try to draw the most complex butterfly on your first try. Begin with a simplified body and round wings, then gradually add intricate patterns. This tutorial outlines a series of simple steps to start your butterfly sketch in no time. * **Practice Symmetry:** Symmetry is crucial for butterflies. If you're struggling, try drawing one side of the butterfly, then fold the paper along the center line and lightly trace the outline onto the other side. Or, use a mirror to check your symmetry. * **Draw Lightly First:** We can't stress this enough. Light lines are easy to erase and adjust. Only press harder when you are confident in your lines. * **Use Reference Images:** Look at real butterfly photos. Observe their wing shapes, vein patterns, and colors. This will give you a deeper understanding of their anatomy and help you create more realistic drawings. * **Don't Be Afraid to Trace:** Sometimes printing the page helps, or you can even trace the final butterfly rendering if it helps you! Tracing is a legitimate learning tool for understanding shapes and proportions. It helps build muscle memory. * **Be Patient and Have Fun:** Art is a journey, not a race. Enjoy the process of creating. This tutorial is perfect for beginners as well as anyone looking to relax and experiment. Embrace imperfections as part of your learning curve. I thought girls were born knowing how to draw a butterfly, but that's not true! It's a learned skill, and my little girl loves them, so here are some easy step-by-step instructions for everyone!Beyond the Basics: What's Next in Your Drawing Journey?
Congratulations! You've successfully learned how to draw a butterfly, from basic shapes to intricate patterns and vibrant colors. But your artistic journey doesn't have to stop here. The skills you've developed are transferable to countless other subjects. Consider exploring different types of butterflies. While we focused on the monarch, the world is full of diverse species, each with unique wing shapes and patterns. Try drawing a swallowtail, a morpho, or a painted lady. Experiment with different drawing mediums too – watercolors, pastels, or even digital art. You can also explore drawing butterflies in different poses, such as flying or resting on a flower. Be sure to check out all the wonderful things to draw beyond butterflies. The principles of observation, breaking down complex forms, and building up details apply to everything from landscapes to portraits. Keep practicing, keep experimenting, and most importantly, keep having fun with your art!Conclusion
Learning how to draw a butterfly is a fantastic entry point into the world of art, offering a blend of technical challenge and creative freedom. We've walked through the essential supplies, the fundamental steps of sketching the body and wings, and the exciting process of adding intricate details and vibrant colors, with a special focus on the majestic monarch butterfly. Remember the importance of starting with light lines, embracing symmetry, and using reference images to guide your hand. Whether you're a complete novice or looking to hone your skills, the joy of seeing a beautiful butterfly emerge from your pencil strokes is incredibly rewarding. So, don't hesitate to pick up your pencil and paper and give it a try. The world of butterfly art awaits your unique touch! We hope this comprehensive guide has empowered you to create stunning butterfly drawings. What's your favorite part about drawing butterflies? Share your thoughts and creations in the comments below! If you enjoyed this tutorial, consider exploring our other easy drawing ideas and step-by-step guides. You can even join our monthly membership and download our app to watch more lessons in a safe, distraction-free environment. Happy drawing!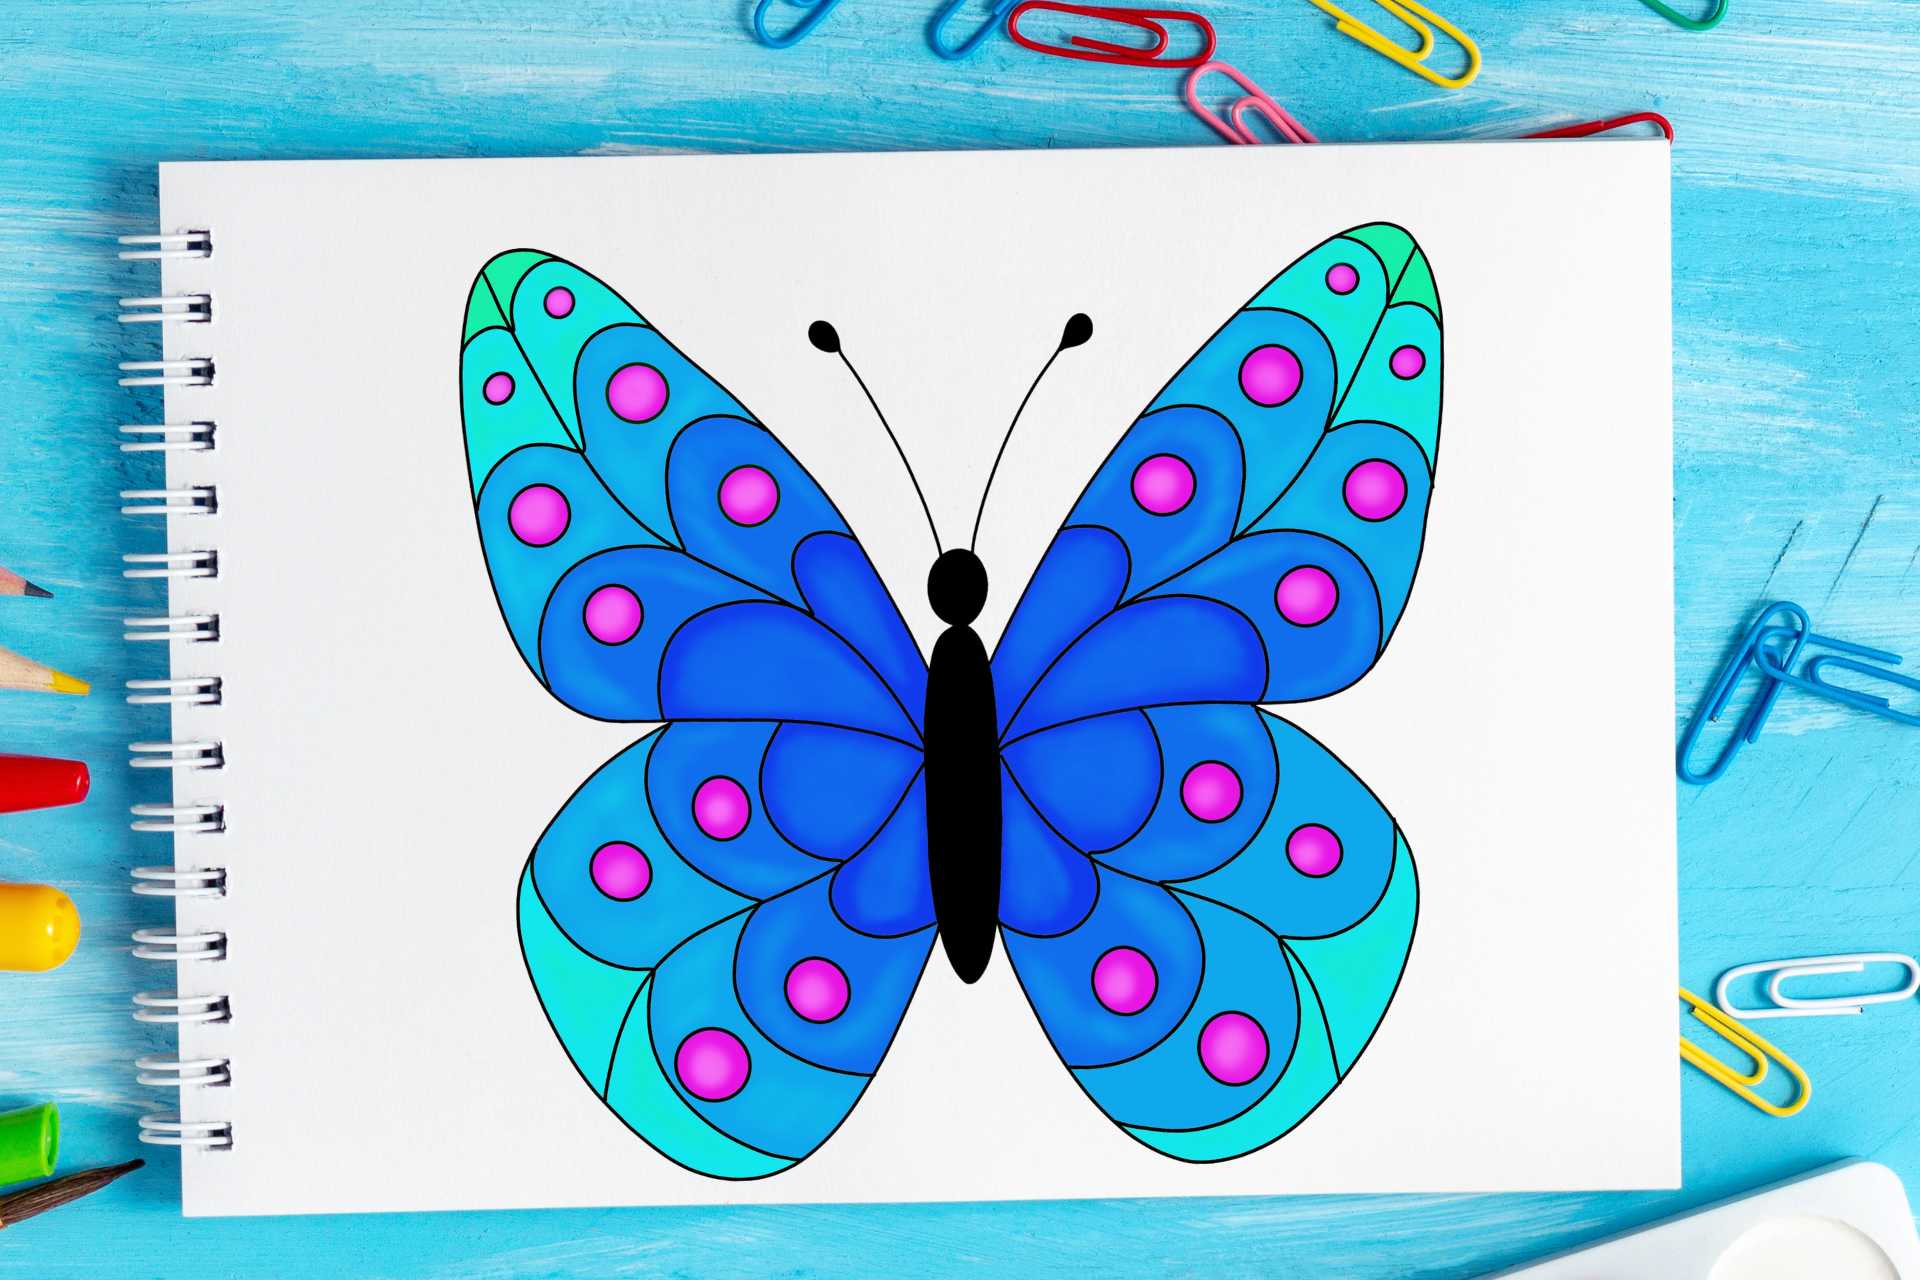
How to Draw a Simple Butterfly | Step by Step Drawing

Preschool How To Draw A Butterfly at Glen Bannerman blog
202-how-to-draw-a-Butterfly-steps - Craft-Mart
